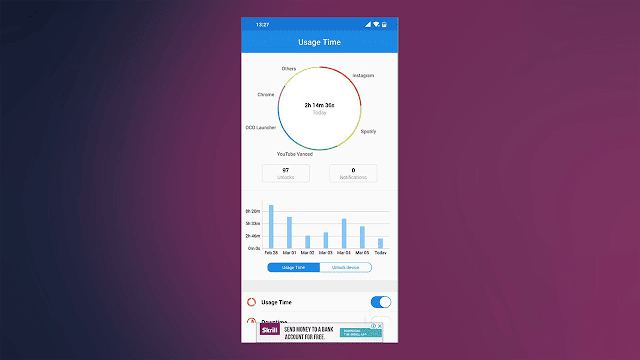
Worried about your little kids continuously staring at those glazy lights of smartphones? Well, you might find your solution here. The Digital Wellbeing element of Android will let you know about your screen time daily with its app. This will also show you a list of those apps from which you get the maximum of notifications. The feature fragments your screen time into the apps you have spent most of your time on. There is a pie chart that shows you the related data. The parts divided in the circle show your screen time and below that, you will see the number of times you have unlocked your phone and the number of notifications you received in a day.
Enabling Digital Wellbeing on Your Android
You can use the Digital Wellbeing option on your Android phone from your phones’ settings.
1. Go to the ‘Settings’ option on your Android phone.
2. Scroll down to select ‘Digital Wellbeing and Parental Controls’.
3. Choose the ‘Show your data’ option.
4. Move to the top right-hand side corner of the screen and select the three-dot menu.
5. Click on Manage your data option.
6. Turn on the switch beside the ‘Daily device usage’ option.
7. Now your Android phone will record, register, and analyze your app usage, number of notifications, and number of times you unlock your device.
8. If you want to access the feature through any shortcut icon, then choose the ‘Show icon in the app list’.
Monitoring Your Screen Timing
There are a number of tools and ways provided by Digital Wellbeing for helping you to lessen your time spent on mobile screens as well as distractions. It categorizes all into two: means to disconnect and decrease interruptions.
Set Timers on Apps
The best option to put a bar on the time you spend on screen is setting a timer for your maximum used apps so that you do not keep on spending unnecessary time scrolling Instagram or playing your favorite game rather than working, studying, or interacting with your family and friends. You are putting a limit on the amount of time you would spend on these apps every day when you set a timer. After your time limit is crossed, the setting will notify you and your app will be blocked from access. Now you will only be able to use it when the next day starts unless you manually switch the feature off. Follow these simple steps to set the app timer:
1. Go to your Dashboard.
2. A list of all the apps you use the most will show up on your screen. Select any app and it will show you your time spent on the app, total notifications received, and the number of times the app was accessed. Now, click on the hourglass icon that appears beside the app icon.
3. Set a time limit according to your need.
4. Hit the trash can icon that appears beside it, to remove the timer in the future.

Setting Bedtime Mode
This mode lets you cool down and rest after a hectic day. It puts your phone on silent and turns the screen to grayscale. This way it makes sure that you sleep on time without wasting time on social media. You can also put your phone on Do Not Disturb mode with its customizations. For that, click on Customize to turn on DnD mode when you go to sleep. There is an option to adjust your bedtime mode according to your time or enable it when you put your phone to charge before sleeping. In all these cases, you can assign your turn-on time and turn-off time.
Enabling Focus Mode
With the help of focus mode, you can stop all your apps temporarily. You can either do this manually or schedule it to work automatically. It lets you select your preferred time, or day(s). You also get the option to take a break between your work. This option will give you some time as a break to access your apps.
If we talk about the Reduce Interruptions option, it lets you restrict notifications from selected or all apps and puts your phone on DnD mode.
Using Parental Control to Manage the Screen Time of Your Kids
You can keep a check over the time your kids spend on phones if you have a default parent account on their phones. Begin systemizing parental controls within the settings page of Digital Wellbeing. For that, you will have to download the Family Link which is a Google app that requires both the parent and child to have an account on Google.
1. Head to the settings screen of ‘Digital Wellbeing and Parental Controls’.
2. Select the ‘Set up parental controls’ option that appears at the bottom.
3. Now click on ‘Get started’ from the next screen.
4. Select ‘Parent’.
5. A prompt will appear asking you to install Google’s Family Link app. After installing,  move ahead with the prompts that appear on screen to complete the process.
Monitoring the Phone of Your Child
If you want to control the screen time on your child’s phone and other settings, link your email accounts first.
1. Open Settings on your child’s phone and go to the ‘Digital Wellbeing and Parental Controls’ option.
2. At the bottom of the screen, you will see the option to set up parental controls, click on it.
3. Select ‘Get Started’.
4. Choose the ‘Child or Teen’ option.
5. Select the option to create or add an account if it is not already there. After adding an account, select the control option from the list and keep following the prompts.
Reducing screen time is not easy and all these tips can only work if you are determined. Especially in the case of Kids, it is difficult to do. Therefore, along with these techniques, you must inculcate the value of a healthy lifestyle in your kids.
Harry Williams is a Microsoft Office expert and has been working in the technical industry since 2002. As a technical expert, Harry Williams has written technical blogs, manuals, white papers, and reviews for many websites such as office.com/setup.
When you think of famous RPG fantasy tabletop games, Pathfinder and Dungeons & Dragons are the first in your mind. While this automatically reflects how good these games are, it might also confuse you about which one you should choose.
Among all the fantasy games, over the years, Dungeons & Dragons have won many hearts. The game was released more than 40 years ago to offer players of the world the chance to witness their fantasy dreams with simple calculations and dice rolling.
During 2008, the game’s fourth edition started receiving very mixed reviews. That is when Paizo Publishings came out with Pathfinder, which is hugely founded on the third season of Dungeons & Dragons as this was the most successful season of the game. These two games have gained popularity over the years and have also released their sequels— Pathfinder Second Edition and Dungeons & Dragons Fifth Edition. If you are starting with RPG games, then you might be confused between these two. Here is a classification of these two games which will help you decide which one you should go for.
Entry Of Pathfinder
The fourth edition of Dungeons & Dragons made various changes into the game and its mechanics, which hugely disappointed the fans. For a long time, fans continued wishing for any update and revival of the older mechanics of the game, but it did not happen.
Leveraging the scenario, Pathfinder was released with similar mechanics as it was in 3.5 and eased many different aspects of the game, thereby incorporating massive customizations and complexity. This made Pathfinder a right combination of the complexity gamers wanted and the mechanics they wished for. In fact, it’s sale was even more than the fourth edition of Dungeons & Dragons.
This is because Pathfinders knew that fans like the previous mechanics more and incorporated that in their game. In fact, famous tabletop players loved and chose Pathfinder rather than the fourth edition of Dungeons & Dragons, which is why even the new gamers looked forward towards Pathfinder. The game lets you choose from a big bunch of races, and offers fascinating skills, monsters and enemies.

New Editions Of Both The Games
Like Dungeons & Dragons edition four failed miserably, the makers started with the fifth edition to overcome the loss of failure. The makers developed the fifth edition of Dungeons & Dragons with straightforward mechanics for any gamer to catch up with it. They also changed the addition and subtraction system of ability checks into an advantages and disadvantages system. This way, the makers refined the game with simple mechanics without disappointing the players.
Dungeons & Dragons’ fifth edition is the first in its series that depends on the players’ united thinking capacity. It entirely depends upon the player if they want to use a grid and figurines or not. Hence the game is suitable for both beginners and veterans.
No doubt, Pathfinder is still the favorite of those who like simple gameplay and but higher complexity, but the fifth edition soon built a wholly new and vast kind of audience base. Hence, Paizo came up with the second edition of Pathfinder.  The second edition did not add some big new things but groomed the game’s existing factors. It focused singly on what players already loved in the game.
Making The Choice
Before making a choice, you first need to decide what your expectations are from the game. If you want imaginative gameplay with accessible content and rules, then go with Dungeons & Dragons’ fifth edition as it will suit you the best. On the other hand, if you want to be involved in a game with complexity and customization options, Pathfinder is right for you.
Both of these RPG games are fun and while new players mostly go for the fifth edition of Dungeons & Dragons, old school tabletop game fans go for Pathfinder. Both these games involve calculations and math; therefore, you need to decide how much you can go on with the calculations while living your fantasy game world.
Cynthia Strickland is a creative person who has been writing blogs and articles about cybersecurity. She writes about the latest updates regarding office.com/setup and how it can improve the work experience of users. Her articles have been published in many popular e-magazines, blogs, and websites.
Just using video software won’t make you a perfect editor as there are many processes that are required to take your video editing to the next level. You may have watched the movies in which an actor flies without wings, reaches from one destination to another, and fights using a fictional energy sword known as a lightsaber. You may have sometimes thought about how these films are produced. Are all these weapons real? The answer is simply “No”. It may be very simple for you once you get the hang of these must-have plugins. To take your video editing to the next level, you can make use of some of these best plugins that may surely assist you a lot in giving your videos a finishing touch.
These best plugins are professionally designed to suit all your needs. To achieve the expected results, you must have all these plugins. The task of editing videos like a pro is going to be easier for you from now onwards as you have come to the right place. To use these plugins, all you need to do is just install them to your existing video editing software and start taking advantage of them. Here is the list of all the best video editing plugins that will enhance your video quality and make it more appealing to eyes than one may have ever thought. Now is the time to have a glance at these best video editing plugins.
Red Giant Trapcode Particular
On the list of the best video editing plugins is Trapcode Particular. The plugin works great and flawlessly as it is the advanced particle generator. If we make a comparison between this one and the stock generators in After Effects, Trapcode is likely to emerge as a winner as it makes it easier to create complex particles and effects. The latest version of Trapcode Particular has come with some of the amazing features that give you a chance to do more with your editing skills. Users have now got an ability to create dynamic swirling effects with the latest Dynamic Fluid physics engine. There are more than 150 Trapcode Form presets in the latest version of Trapcode Particular that will take your editing skills to the desired level. Install the plugin and start using it from now onwards if you want to shine like a professional editor. To buy it, you can visit the official website of Red Giant. It costs you in the region of $400. You should give it a try as it is your money’s worth.
Boris FX Title Studio
This best plugin is the choice of many professional editors thanks to 3D titling and animation tools. With the help of this plugin, you can create 3D animation with texts. This is the best video editing plugin that is used to create 3D texts of your choice. This plugin is professionally designed to suit your needs. The plugin offers you complete control over cameras, lights, and other stylization elements that contribute a lot to the video production. It has a wide range of professionally-designed presets that make your videos outstanding. Boris FX Title Studio is the best titling plugin in the eyes of professional editors. This amazing plugin allows you to add animated glows, burns, volumetric lighting, and more to your titles. If you are looking for a great plugin for 3D titling, there is no need to wander, the plugin may work best for you. If you have really fallen in love with Boris FX Title Studio, you can get it by shelling out just $199.
Neat Video
Neat Video is greatly admired by professional editors in the field of video production. It really gives your video a great look so that it looks cool. Neat Video is the best editing plugin that you should not miss when you are going through the process of editing a professional video. It is a wonderful plugin that is professionally hailed for its ability to remove the distracting noise from video. The best thing to say about it is, Neat Video does the excellent job of removing noise and fine particles from video without affecting the video quality. The plugin has a smart feature that detects the unwanted noise and removes it from scenes. To make your video look professional, you can take advantage of this great plugin. You can buy it from the official website of Neat Video by shelling out just $75.
Colorista
Every professional editor makes his/her efforts to take their video to the desired level with the help of remarkable editing but without a good plugin, it is not almost possible. Colorista is the best plugin that can transform your video into the professional one. The best video editing plugin is highly regarded by professional editors in the arena of video production. It allows you to make a video look colorful with the help of the color correction tools. The plugin gives your video a finishing touch. It offers you a wide range of features such as vignetting, tint, RGB curves, and Chroma key. It has a vast library of LUTs that make your video more appealing. Colorista has been the choice of many professional editors and is considered to be the best plugin for color correction. If you want to take advantage of this amazing plugin, you may have to cough up $199.
Red Giant Universe
If you have come across all the great plugins but have not yet found any of them suited to your needs, it is the great video editing plugin you are likely to fall in love with. Red Giant Universe contains a wide range of professional tools that allow you to achieve the expected results in video production. The all-in-one plugin is highly recommended by professional ones in the field of video production. This plugin has all the tools required for editing video in a professional way. With the help of all these amazing tools, you can stylize your video and add transitions and effects. Red Giant Universe makes it easier to create complex motion graphics in less than no time. There is a lot to do when you have this amazing plugin installed in your video editing software. How you use this plugin in order to unleash your creativity, just depends on you. Red Giant Universe can’t be bought in a one-off payment as it is available only via subscription that is $30 per month and yearly subscription costs $199 per year. All these plugins above do an excellent job of giving your video a finishing touch and assist you a lot in achieving the professional results. It is likely that all these plugins above may let you unleash your creativity.
Harry Williams is a Microsoft Office expert and has been working in the technical industry since 2002. As a technical expert, Harry Williams has written technical blogs, manuals, white papers, and reviews for many websites such as office.com/setup.
Microsoft Excel is known for its robust spreadsheet programming capabilities that include data documentation, calculation, pivot tables, graphing tools, and analysis. But some users complained that they could not add new cells while using the Excel spreadsheet. So, if you want to know how to fix the issue, then follow this blog.
Delete Cell Protection
Follow the steps given below:
  1. Hold the ‘Ctrl + A’ keys to choose all the cells.
  2. After that, select the drop-down of Format.
  3. Then choose the Format Cells beneath the Protection on the lower side of the menu.
  4. Once you launch the screen, select the Protection section, and untick the Locked option.
  5. Select the OK button.
  6. Navigate to the Review section and select the Protect Sheet or Protect Workbook.
  7. Input the password to clear protection through the workbook or sheet.
  8. Now, hold the ‘Ctrl + S’ keys altogether over the keyboard to store the file.
  9. Close the screen and then launch it once more.

Unfreeze the Frozen Panes
Here are the steps you need to follow:
  1. Navigate to the View section.
  2. After that, select the drop-down of Freeze Panes.
  3. You should click on the Unfreeze Panes through the menu.
  4. Then store the file by holding the ‘Ctrl + S’ button over the keyboard.
  5. Now, relaunch the file then check whether the issue has been solved.
Copy the Data to a Fresh Sheet
Follow the steps mentioned below:
  1. Launch the problematic sheet.
  2. After that, select all data by holding the ‘Ctrl + A.’
  3. You should select the File section.
  4. Then choose the New option and choose ‘Blank Workbook.’
  5. Select the Create option.
  6. Choose the drop-down of Paste into the Home section.
  7. Select the ‘Paste Special’ option.
  8. You have to choose the ‘Values’ option then select the OK button.
  9. Now, store the fresh file and shut it.
  10. Relaunch the file then check if the issue you are troubling has been fixed.
Select a Shorter File Path
Follow the steps mentioned below:
  1. Launch the problematic file.
  2. After that, select the File section and choose the ‘Save as’ option.
  3. Once launch the section, choose the Desktop as the place for the file to be stored then select the button of Save.
  4. Later, shut the workbook.
  5. Now launch the freshly stored file.
Use Office Online
Here are the steps you need to follow:
  1. Navigate to the browser and sign in to the One Drive.
  2. Then choose the button of Upload.
  3. Go to the Files option.
  4. Reach the location wherever the doubtful file of Excel is saved.
  5. Click on the file.
  6. Select the Open option.
  7. Later, attempt adding new columns or rows to the sheet.
  8. In case successful, you should then download the file to the PC.
Cynthia Strickland is a creative person who has been writing blogs and articles about cybersecurity. She writes about the latest updates regarding office.com/setup and how it can improve the work experience of users. Her articles have been published in many popular e-magazines, blogs, and websites.
Windows 10 launches its patches and updates frequently to improve your system performance. But sometimes after updating the OS, the desktop icons disappear . So, if you want to fix it, then here are some ways to solve the problem.
Run Explorer .exe
Follow the steps mentioned below.
  1. Hold the ‘Ctrl + Alt + Del’ keys altogether over the keyboard to invoke the Task Manager
  2. After that, invoke the Process section and find the ‘explorer .exe’ then choose it.
  3. You should select the button of End Task on the lower side.
  4. Once you reach the Task Manager, select the File option at the upper left side and choose the Run new task option.
  5. Now, input ‘explorer .exe’ into the box, then continue to select the OK button.
Use System Restore
Follow the instructions given below:
  1. You should invoke the Windows menu and input ‘rstrui.exe’ into it and select the OK button to launch the Windows System Restore tool.
  2. Then pursue the on-screen steps until you reach the page with each of the existing restore points.
  3. You have to choose the restore point on or once you begin facing the problem then activate the restoration procedure.
  4. Now, reboot the system.

Turn off the Tablet Mode
Here are the instructions that you need to follow:
  1. You should invoke the Settings on your system.
  2. After that, select the System option and then pick the Tablet mode through the left side.
  3. Then find the Make Windows more touch-friendly, once you use the device as a tablet then change it to off.
  4. Now, the desktop icons can show. In case that doesn’t apply, attempt enabling and disabling Tablet mode a moment.
Don’t Forget to Enable the Show Desktop Icons Feature
Here are the steps that you need to follow:
  1. Go to the blank area and right-click on it over the desktop.
  2. Thereafter, select the ‘View’ option, and you can view the option of ‘Show Desktop icons.’
  3. Now, attempt marking and unmarking the option of ‘Show Desktop Icons’ a while but don’t forget to leave the option marked.
Rebuild Icon Cache
Follow the steps given below:
  1. Navigate to the Windows menu on your system.
  2. After that, input ‘file explorer’ into it and select the OK button to invoke the File Explorer.
  3. Then reach the ‘View’ option and mark the ‘Hidden Items; box in sort to show hidden folders or files.
  4. Go to this path and move down to the bottom: ‘C:\Users(User Name)AppDataLocal’
  5. You should select the ‘IconCache.db’ and right-click on it then choose the OK button.
  6. Select the Yes button.
  7. Reach the Recycle Bin folder and clear it.
  8. Now, reboot the system.
Cynthia Strickland is a creative person who has been writing blogs and articles about cybersecurity. She writes about the latest updates regarding office.com/setup and how it can improve the work experience of users. Her articles have been published in many popular e-magazines, blogs, and websites.
Artificial Intelligence nowadays is a very popular concept in the science and technology field. With its assistance, you can complete your work in much less time. This is because AI automates your work across many industries so that you can do your work in less time. Here are 8 best Artificial Intelligence apps that you can use on Android and iOS.
These apps on your smartphone can help you finish your work in much less time. They have a good AI algorithm that can effortlessly put up with your habits, learn what you like, what you don’t like, tour work timings, and all your daily routine.
1. Cortana
Cortana is a personal assistant app created by Microsoft. It is very smart and helps you to easily track your files, images, videos, and others from your device. You can also sync your PC and smartphone with it, to get your notifications on both the devices. For example, you can set a reminder on your PC to buy milk and Cortana will also alert you about the same on your smartphone. It is a good artificial intelligence app with which you can easily complete your basic digital tasks.
2. Robin
Robin is a very well known artificial voice assistance app for Android and iOS users. It is a free app that can be easily used on any smartphone. It can also let you write a text message through your voice without touching your smartphone, guide you with GPS navigation, tell you funny jokes, and listen to your voice commands. The app also works well with reminders. This app is currently in the beta process therefore, it cannot provide you with a lot of information but it updates itself daily according to the users’ concerns and questions.
3. Socratic
Socratic is the best Math and homework helper app which is available on both Android and iOS. It can seriously help you to do your homework in less time and with adequate methods. Its artificial intelligence feature works very well with which it will help you complete your homework. All you have to do is take a picture of your question with the device’s camera and it will promptly provide you with everything you need to know to solve the problem correctly.
4. Edison Mail
Edison Mail which is also known as easilyDo is a smart assistant app that acts as a personal assistant for you. The app is available for both Android and iOS and is free to download. It can tell you about the traffic on your way to your destination so that you know when to leave for your work. Using its Artificial Intelligence, it can also remove duplicate contacts from your contact list. You can also ask it about the shortest and fastest way to your home. The app can also smartly book your ticket for hotels, movies, restaurants, events, and others.
5. FaceApp
FaceApp is one of the very famous artificial intelligence apps. The app is developed by Facebook and is available on both Android and iOS devices. It uses AI to easily transform your images into fun photos. You can change your look, gender, hairstyle, and many other things with this app. It has amazing filters with which you can change your smile, add face filters, and make a fun photo. You can even change your hairstyles and create a new hairstyle for free.
6. SwiftKey Keyboard
The SwiftKey Keyboard is an artificially intelligent keyboard for android and iOS users that corrects your wrong text automatically. Its amazing feature will autocorrect your word and sentence while you type. Apart from the autocorrecting feature, you can also change your font style, color, design, and theme of the text and keyboard. It also has a good emoji collection.
7. Leia
Leia is a very useful artificial intelligence apps for Android and iOS users which can build a website for you without you having any development knowledge. The app is created by Vybe Software LLC for Android and iOS users. It is a free app and has in-app purchase options. The app can also be used as a voice to text app on your smartphone. The best part is that it also has a vast collection of themes to design a blog, website, landing page, and others, that too on your smartphones.
8. Replika
Replika is an AI app that will help you to improve your conversation skills. You can also call it your good friend as you can easily download it on your Android and iOS devices to start an endless conversation with it. The app lets you learn about your true personality. You can save your notes here, create memories on its notepad section, and also handily track them anytime. The app is available for free on all Android and iOS devices.
Cynthia Strickland is a creative person who has been writing blogs and articles about cybersecurity. She writes about the latest updates regarding office.com/setup and how it can improve the work experience of users. Her articles have been published in many popular e-magazines, blogs, and websites.


Source: https://fmsoffice.com/hanna-season-2-episode-3-hanna-loses-marissa-and-clara-both/

In the third episode of the extremely popular show, ‘Hanna’, the protagonist Hanna tries to discover the area where The Meadows is located. She desperately wants to save her close friend Clara from the operatives of UTRAX. Right now the only way she can do this was by investigating Passway, which is a pharmaceutical corporation that carries out clinical tests. The excitement comes when she finds out that an employee of Passway has a delivery of implants to make for the trainees of all-new UTRAX operation. This is when she decides to follow him, as she believes that this will probably lead her to the new location of The Meadows, and help her get to Clara.
Hanna’s only ally, Marissa agrees to help, hesitatingly, and arranges a passport for Clara as well. Not just this, she also establishes a connection with one of the CIA operatives, who was on Carmichael’s payroll and was following Hanna. They found out that Hanna was alive and that she was the one who had broken into Passway a few days ago. However, Marissa always lied and never opened up to Carmichael about Hanna. She even went out of her reach to help Hanna track the shipment that was headed for The Meadows. But, when she and Hanna were waiting to get on the ship, Marissa got a call from Carmichael and had to step out of her car.
While Marissa was on call, Hanna decides to skim through Marissa’s bag as she notices how worried Marissa got about Hanna being near her bag. This is when she finds out the visiting card that Carmichael had given Marissa and she also sees same the number as the recent contacts on Marissa’s car. Due to this, Hanna gets extremely suspicious about Carmichael and she decides to run away from Marissa. She even beats up Marissa and abandons in a bloody and bruised state. Marissa doesn’t understand anything and wonders why Hanna alienates herself from the only ally she had.

After abandoning Marissa, Hanna follows the shipment to the location of The Meadows. She hides the passports in a tree around The Meadows facility and decides to break in and free Clara. But, Hanna is unaware of the fact that by now UTRAX has Clara convinced that The Meadows is the best place for her to be. They gave her a family, an identity, and assured her about safety. Clara had lived without all these for years and that was exactly what she wanted. This is why UTRAX became successful in retaining her.
The Meadows also gives Clara a letter to read that was written by her mother when she was born. All these changes Clara’s mind about The Meadows. By now, Clara has started considering The Meadows as her home. While trying to rescue her, Hanna looks at Clara and realizes that coming to rescue her was a big mistake. Hanna always believed Clara to be someone just like her, who was trying to prove the fate of being a trained killer as wrongdoing. But this big change in Clara leaves Hanna shocked. While she was encircled by all these thoughts, she gets into the hands of the guards at The Meadows. Towards the end of the episode, Hanna loses her friend and her only ally. It will be thrilling to see what more is to come. Stream all episodes of Hanna on Amazon Prime Video.
Cynthia Strickland is a creative person who has been writing blogs and articles about cybersecurity. She writes about the latest updates regarding office.com/setup and how it can improve the work experience of users. Her articles have been published in many popular e-magazines, blogs, and websites.
Buneary is one of the most precious Pokémon for Pokémon lovers around the world. Since the introduction of Buneary in Pokémon Diamond and Pearl, it has earned a lot of popularity and now reappeared into Pokémon Sword and Shield Isle of Armor. Buneary and Lopunny both are way cute Pokémon, but you don’t see them fighting a lot. However, both Buneary and Lopunny carry a great variety of moves that you can try out. So if you don’t have these cute Pokémon, here is the best possible way to find Buneary in the Isle of Armor.
Locate Buneary in Pokémon Sword and Shield
In the Isle of Armor, you can see enormous Buneary everywhere. You can find it on the Fields of Honor, along with it you can challenge on Beach in any weather condition. Moreover, you can also enjoy running around a while and having a great time in the overworld.
How to Evolve Buneary
There are several Pokémon that can only evolve through friendship, and Buneary is one of those Pokémon. It is a hidden stat. section that can be checked through setting up the camp and later on watches the whose value of friendship you want. The hearts on the heads of Pokémon will show the friendship stat to you. Stars can be up to 5, and according to this, the value of friendship reflects.
 When the level of friendship is higher, Buneary will evolve in the Lopunny. The value of high friendship will be 220 or bigger. Creating a high friendship is not an easy task because, at the time of catching the Pokémon, the friendship stat is probably zero. So you will struggle a lot to increase the friendship value, and once it’s done, Buneary will be ready to evolve.

Now you visit the Hammerlock to keep track of your friendship stat. Hammerlock central Pokémon centre has NPC in the house, and they keep all the track record of a friendship. They have records related to help that you raised for your Pokémon with current friendship level. There you will get the rough estimate of your friendship value with your Buneary Pokémon.
Once you visit the NPC in the Hammerlock, the already caught Pokémon Buneary is going to be invaluable for attaining the Lopunny. It will happen because the woman back into the house will offer you Soothe Bell. Once you acquire the Soothe Bell to Pokémon, it grows the friendship of Pokémon. So whatever activities you will do with your Pokémon like playing, battle, and making curry will be added as a bonus of your Pokémon. So once you equip the Soothe Bell, some of the things will be changed and you will earn more bonus than friendship value.
Use of Lopunny in Battle
Lopunny will not be going to help you a lot in battle because Buneary and Lopunny aren’t meant to be a battle Pokémon. If you are looking for better Pokémon in battle, Lopunny is not one of them. It cannot compete in extremely intense fights. Although they have some moves, they are normal-type moves. If you battle in a small field battle, it can help you a bit, so whenever you choose it, choose smartly.

Cynthia Strickland is a creative person who has been writing blogs and articles about cybersecurity. She writes about the latest updates regarding office.com/setup and how it can improve the work experience of users. Her articles have been published in many popular e-magazines, blogs, and websites.

Everybody loves podcasts because it takes no effort to listen to them. You can listen to them while traveling to work or between your lunch breaks or during your relaxing time. All you need is a set of earphones and an internet connection on your phone and you are good to go. Podcasts establish connections between the people and the host. The intimacy of audio makes us sense like we’re part of their cozy conversation. Also, we get to listen like we’re the only ones in the room. Here are 8 podcasts every entrepreneur should listen to.
1. The Tim Ferriss Show
Tim Ferriss is a self-experimenter and the author of his bestseller book, The 4-Hour Workweek. The Tim Ferriss Show deals with topics that Ferris considers interesting. His podcast will surely teach you something new. He calls various guests on his show such as Arnold Schwarzenegger, LeBron James, and Silicon Valley journalist Kara Swisher. In this show, Ferriss talks with brilliant performers from diverse areas, including investing, chess, and pro sports, and then researches about tools, tactics, and tricks that his listeners can use in their field.
2. This Week in Startups
This is a weekly podcast by Jason Calacanis and a changing group of guest experts who bring you the best, worst, most outrageous, and most interesting stories of web companies from all over the world and discuss it. He delivers stunning insights into how angel investing works and how he builds companies.
This Week in Startups carries detailed interviews with heavy-hitters in the tech industry and gives detailed knowledge of what’s happening in the market and what trends are emerging. If you are going to start your own company, and need strategies for improving your business, or help to encourage your team, or just want to know what’s happening in Silicon Valley and beyond, you should listen to this podcast.
3. How I Built This
In How I Built This, Guy Raz digs deep into the stories behind some of the world’s famous companies. In every show, Raz uses his disarming sense of ‘wow’ to talk guests to his guests about their stories. Raz goes deep with each person in his interviews, in order to pull out insights and gets them to open up about even those details they wouldn’t normally share. How I Built This tells you the journey of innovators, entrepreneurs, and idealists, and the internal confusion they confronted along the journey to success.
4. The School of Greatness with Lewis Howes
The School of Greatness is a very famous podcast and runs for 500-plus episodes. It has more than 40 million downloads and calls celebrities like Tony Robbins and Maria Sharapova.
The show is hosted by Lewis Howes who is the best-selling author of The School of Greatness and The Mask of Masculinity. His show tells about what makes the greatest people great and teaches them to apply those lessons in life. In The School of Greatness, he shares motivating stories of brilliant businessmen, athletes, and influential celebrities.
5. How to Start a Startup
This is probably a one-stop business course for people who want to start startups. This podcast gives you firsthand, hard-won knowledge from Sam Altman and others at Y Combinator. These are actually the class lectures given at Stanford University, and now they are available for the whole world.
The podcast comprises lessons from Sam Altman, Dustin Moskovitz, Paul Graham, Peter Thiel, Marc Andreessen, and Marissa Mayer. The show covers almost everything you need to know to start and run a business. Invest the time in listening to this podcast if you want to have a startup of your own.
6. Recode Decode with Kara Swisher
Kara Swisher, the host of this show, is one of the very famous journalists of Silicon Valley. She conducts candid interviews with tech execs, politicians, celebrities, to know about their great ideas and how they plan to change our world. In Recode Decode, she ruthlessly and mercilessly carries one-on-one interviews with the greatest names in tech. She’s fierce and rough and is always ready with a tough follow-up question. Her famous interviews were with Tesla CEO Elon Musk, former Secretary of State Hillary Clinton and Facebook CEO Mark Zuckerberg.
7. The James Altucher Show
The James Altucher Show takes you into the lives of the ultra-successful performers, including billionaires, best-selling authors, rappers, athletes, etc. He interviews world champions in every field to find out the story you can relate to. He looks for those who created their own paths, established financial freedom, and have the ability to build more meaningful and fulfilling lives. In fact, Altucher himself is a prosperous entrepreneur, chess master, investor, as well as a writer.
8. Mixergy
This is the podcast for ambitious entrepreneurs preparing their own startup. Mixergy is the best “street smarts” education you can get. The show teaches you from the experiences of the proven entrepreneurs. He has conducted over 1,000 interviews till now. The host Andrew Warner is a fierce man and does not hesitate before asking uncomfortable questions. This way, he goes deeper into the successes and failures of the most prosperous business founders and thought leaders. He finds out powerful and inspiring stories of successful people and shares them with you.
Cynthia Strickland is a creative person who has been writing blogs and articles about cybersecurity. She writes about the latest updates regarding office.com/setup and how it can improve the work experience of users. Her articles have been published in many popular e-magazines, blogs, and websites.
The whole of England must be dancing right now because why not? The ultimate international music star Lionel Richie is going to appear for a major concert in Nottingham, England in the 2021 summer. A huge number of 18,000 tickets will be put on sale from next week to see the hitmaker, Lionel Richie at Victoria Embankment. He has a career of five decades, which is tremendous and the man is still going up. Few other special guests will join Lionel on the banks of the River Trent on Friday, June 11. However, the names of the guests have not been disclosed yet.
Everyone knows that the green space of Victoria Embankment is the home of England’s annual Riverside Festival. You all will be surprised to know that it is the first time a music concert on this big scale is going to happen there since Bryan Adams headlined City In The Park in 2001. The festival also featured James and Gabrielle on the bill, but was moved from Wollaton Park which was shut down at that time due to the foot-and-mouth crisis. The story of coincidence is that the festival was also organized by the DHP Family, who are also the organizers of Lionel Richie concert. The DHP family even described the event as the biggest headline show in Nottingham in decades.
Lionel Richie gained much love by a series of hits with his 70s group The Commodores such as Three Times A Lady and Still. Not just this, Richie has even celebrated worldwide fame as a solo artist, who has sold more than 100 million albums, won an Oscar, a Golden Globe and four Grammy Awards. This is not ordinary, people!
Of course, the fans can expect this 71-year-old stunning man to perform many of his classic songs which include Endless Love, Lady, Truly, All Night Long, Easy, Stuck on You, Hello, Say You, Say Me and Dancing on the Ceiling.

Concert promoter of DHP family, Scott O’Neill shared how thrilled he is to be able to bring the international megastar Lionel Richie to Nottingham next year. Victoria Embankment is a stunning place and is known and loved for its gorgeous scenery and incredible location. This is what makes it the flawless backdrop for the biggest headline concert Nottingham has witnessed in decades. Back in 2001 Bryan Adams, The Wonder Stuff, and Less Than Jake played a bank holiday weekender here and since then, it has been 20 years since the venue was not used up to its full capacity. 
With all the coronavirus situation going on, it’s good to have such a huge gig like this to look forward to for next summer. The concert is going to be a part of his Hello Tour 2021 and we will also see him at the Isle Of Wight Festival. The last time Richie played in Nottingham was in 2015 at the Motorpoint Arena which was a sold-out show.
This show’s tickets are priced at £67.50 and will be put to sale on Friday, July 10. A pre-sale is also organized for those with an NG postcode from next Friday, July 3 at 10 am. Alongside, VIP tickets will also be on sale priced at £150 and will include a Gold Circle viewing area in front of the stage, a Fast Track Entry, and Access to an exclusive private VIP and bar area with toilets.
The Lionel Richie mega concert is going to be a part of the DHP family’s Splendour Festival which will also be organized next summer at Wollaton Park on Saturday, July 24. We are sure you guys cannot wait for more to give Lionel a big Notts welcome!
Cynthia Strickland is a creative person who has been writing blogs and articles about cybersecurity. She writes about the latest updates regarding office.com/setup and how it can improve the work experience of users. Her articles have been published in many popular e-magazines, blogs, and websites.
The users of Microsoft Teams can upload their background images for calls through a video conferencing app. Microsoft is leveling up the field between the Teams app and the Zoom feature.
Microsoft has travelled far ahead in its quest to make its video chat feature Teams supreme and outstanding. It seems that the company has become successful in its pursuit. It is now supporting custom backgrounds, one of the most beloved features first adopted by video conferencing app, Zoom.
Initially, when Zoom allowed its users to upload their custom backgrounds feature, people everywhere welcomed it wholeheartedly. Now, the customizations in virtual call backgrounds have become a standard for the industry.
The current health outbreak pushed almost everyone to stay and work from home. As people all across the world are forced to stay at home and companies to allow the people to work from home, the need for video conferencing apps was felt immensely. The social distancing and work from home forced people to use video chat apps more and more. Also, the current situation has encouraged many companies to come out with more video chats apps. As and when companies started launching video chat apps, they also got busy in introducing various innovations in these apps to make them more productive and useful for the businesses and individuals. The introduction of custom backgrounds is also an example of such engaging tweaks.
It is a known fact that most of the users often do not take any interest in pointing cameras in their offices and living rooms. In such a situation, custom backgrounds came to the rescue of the users and worked great to hide the distractions. Moreover, these custom backgrounds have been enjoyed by almost every user during the video chats. Until now, Zoom had allowed its users to upload their images for video chat backgrounds. Now another popular video conferencing app, Microsoft Teams has also allowed its users to upload their pictures for video chat backgrounds. Previously, Teams had allowed its users to custom backgrounds from the list with in-built options. The company has announced the new update in its Microsoft blog. The blog post is also updating about a few other updates of the company.

However, the blog post is not providing any information required of ratio and size for the virtual backgrounds to be uploaded. But, the blog post has set the resolution about 4096×2160 for the images which is standard for 4K cinema. It means we can conclude that models of 16:9 ratio should work for uploading a custom background. The image resolution set by Zoom is 1920×1080 which is considered as the standard and common size for almost all displays. So, the users will find nearly all images fine for uploading as their custom background. Also, whatever you will search for Zoom custom backgrounds will apply to Teams.
Use Your Images to Set as Teams’ Custom Background
If you want to enable the feature, then it is very easy to implement. First, log in to Microsoft Teams virtual meeting and click on the icon of three dots placed horizontally. Once you click on three dots, it will bring you the list with various options. You will need to select and click on “show background effects“. You will be redirected to multiple possibilities with the new option with the title “+Add New“. For uploading an original image, You will need to click on the option +Add New which will add the particular image to the list of custom background options. You can choose your model for uploading from the background option list.
It is worthwhile to understand that the custom background image chosen by the user will also work without any green screen. It is very much the same as it worked previously with pre-installed options of Microsoft. Microsoft Teams will still use the same artificial intelligence and algorithms that will separate the users from the custom background. Now, if you want to know about the impacts of a specific color and the conditions of lighting within your room, then it advisable to first test the first new custom background in a solo room of Meet Now. Then, you can think of debuting the Meet Now publically.
Cynthia Strickland is a creative person who has been writing blogs and articles about cybersecurity. She writes about the latest updates regarding office.com/setup and how it can improve the work experience of users. Her articles have been published in many popular e-magazines, blogs, and websites.
If you are fascinated by the TikTok videos ‘Where is Your Soulmate,’ then you can also make your video. Here are the instructions you need to follow.
TikTok is popular among a large number of users all across the globe. It has been designed in such a way that you can make short videos and make it viral in just a few minutes. Those who know the right formula can become a big star with a huge fan following on this platform. However, the ways for making videos on the popular filter ‘Where is Your Soulmate’ is quite different from that videos users often make on TikTok but not so complicated. If you are also among those wondering how to make videos using the popular filter  ‘Where is Your Soulmate,’ then it is not so difficult. But, you should have an account on the Instagram app after getting it downloaded.
The filters featured on Instagram are wildly popular among users. Many users often create their videos and share them on the platform. Many other users copy these videos by using similar filters and upload them on the platform. In this regard, the working methodology of filters is very much the same as the way used by the TikTok videos and challenges to go viral. On TikTok also, the users make and share videos, and when these videos become viral, many other users copy and use the same style and music to upload their version based on the same viral videos.
Now, the main reason why Instagram matters here is being the originating point of ‘Where is Your Soulmate.’ So, the people looking to upload their videos of Soulmate will need to have their account on Instagram. Besides, the users will need to have the app downloaded on iOS or Android to download the filter and video. The users who don’t have their user account on Instagram may run into several issues as the screen is not available on TikTok.

Find and Use the filter ‘Where is Your Soulmate.’
Considering the fact that the users have downloaded the Instagram app on their devices and logged in, they can find the filter by using the search bar. The users will need to search for the profile page of Erika Sacks. As Erika has created the filter and so one you will be redirected to the authentic page, it will become easy to access the filter. The users will need to click on the icon appearing as the smiley face to access all Sacks’ filters. Further, you will need to scroll down and search for Soulmate Radar. Once you found the filter, then click on it to see how the videos of the filter work. Then, you can tap on the option appearing as “Try It,” which will further launch the camera of your device. It will provide the users with a way to test the feature for themselves.
Now, the users will need to record and test the feature to get these videos further on TikTok as they can’t download the filter on TikTok. So, the users will need to make the videos on Instagram, along with testing it. Later, the users can upload these videos on TikTok by using two options. As the first option, you will need to download your video from Instagram Story while sharing your videos on it. As the second option, the users will need to download their newly recorded videos without sharing it on Instagram. The users can download the videos by clicking on the icon of download appearing at the top screen.
Regardless of the options, you are choosing, the users get their videos downloaded to the local storage of the device. Here, the users will need to enable the option Save to storage in the Settings section of Instagram. Now, the users can upload the same recorded and saved video to TikTok like any other video. Also, you can make many other tweaks to your video, including adding songs.
Cynthia Strickland is a creative person who has been writing blogs and articles about cybersecurity. She writes about the latest updates regarding office.com/setup and how it can improve the work experience of users. Her articles have been published in many popular e-magazines, blogs, and websites.
The popular game of Hello Games, No Man’s Sky is still in the playing list of numerous gamers across the world. The major factor behind its emerging demand is the perseverance of Hello Games to keep on updating the game. Thus, they have persisted in doing the same by including a new update in the game. The most celebrated aspect of the new update is that it allows gamers to hatch their own ship. However, hatching of the ship first requires unlocking, so below, we have provided a specific workaround to help the gamers regarding how to hatch your own living ship.
About Living Ship
Gamers first need to know a few things about living ships before proceeding towards its hatching. They are not like a mechanical ship as they can the technology to craft and build. Gamers need to know that the hatching of a living ship is a hard process to accomplish, so it is advisable to be aware while reading about it. The term living ship clearly stated the gamers about it as it is a living ship, and various aspects of it are living creatures. Along with weapons, the gamers have to mobilize the ship with grafted eyes and pulsing hearts. Follow the below-written guide and craft your own living ship in No Man’s Sky.

How to Hatch Your Own Living Ship
The gamers need to know that before initiating the process of hatching, they first need to obtain at least 3200 Quicksilver. Gamers can easily obtain the requisite Quicksilver through the accomplishing of quests. Thereafter, they need to visit Anomaly and require to navigate Void Egg from there. Once they get the Void Egg, then they need to roam to various locations. Soon after some time, they will get a message that will say about the starting of Melody of the Egg quest. Gamers need to keep roaming until they get all the 13 messages.
The 13th message will tell the gamers about the location of the galaxy; gamers need to visit that location. In the precise location, gamers will find the Portal. Once the gamers locate the Portal, then they will get a new message that will say Watch for them from the stars. The living ship is abandoned in the space, and gamers need to find it through the starting of the Starbirth mission. Gamers need to follow the on-screen prompt as it will guide the gamers about the building of ship elements. Gamers also need to use the Void Egg instructions in order to complete the building of the Living Ship.
Gamers need to know that it is happening for the very first time that a game is providing such incredible experience of crafting a living ship to the gamers. The update is just a beginning as there will be more living ships option appears in No Man’s Sky in the forthcoming days. The world of No Man’s Sky has been altered a lot by Hello Games since it released. Thereafter, the game is ceased to get more and more new updates as this avatar of No Man’s Sky is getting a lot of positive reviews by the gamers.
Daniel Ryan is a Norton product expert and has been working in the technology industry since 2002. As a technical expert, Daniel has written technical blogs, manuals, white papers, and reviews for many websites such as norton.com/setup.
The famous videogame franchise of Gearbox Software, Borderlands is in the trending nowadays due to Loot Tinks. The gamers who are not familiar with Look Tink’s; they are newly appeared creatures in the world of Borderlands 3 that favor gamers with a plethora of Loot. Their Loot merely includes Legendary weapons and money. Apparently, loot Tinks are quite favorable for the gamers of Borderlands 3. However, farming loot through Loot Tink is a hard task to accomplish. Thus, below we have provided a specific workaround for the gamers that will help them in farming loot from Loot Tink.
About Loot Tink
The gamers first need to know a few things about Loot Tink before proceeding towards the farming process. Loot Tinks are apparent as a small creature that is red in color. Loot Tinks are well-known for dropping of numerous Loot that includes the money and legendary items. While slaying Loot Tinks, gamers may obtain legendary items and money through drops. Gamers need to find the exact locations of Loot Tink in order to grab Loot. The best place to navigate the Loot Tinks is Jakobs Estate. Below is a specific guide to help you with the farming of Loot through Loot Tinks. Make sure to read the guide carefully to avoid any mistakes.
How to Farm Loot Tink
The gamers need to first go to the Jakobs Estate; thereafter, they need to go to a save station. Once the gamers reached the safe station, then they need to save the game. Once they successfully saved the game, then they need to go to the Bandit Camp. Once the gamers reached the Bandit Camp, then they need to navigate the Loot Tink placed near the main gate.
Gamers need to inflict damage to the located Loot Tink through a fire attack. However, gamers need to be aware of minions who will try to protect the Loot Tink. Gamers need to slain all of them in order to easily fetch all the available Loot from the located Loot Tink. The subsequent Loot Tink will provide legendary weapons to the gamers, in case the players won’t find the drop items essential, then they can easily reload the game. Thereafter, they should again come back to the precise location to obtain legendary items through the following Loot Tink. Gamers need to continue this process until they find the legendary items of their choice.

This one is the easiest and best way of fetching Loot in Borderlands 3 as the whole process only conceives 2 minutes. Although there are several other ways to farm Loot in Borderlands 3, all those ways will require a bit of hard work and technique. Thus, this method is one of the best resorts to collect legendary items and money in Borderlands 3. It is advisable for the gamers to choose upon a legendary weapon type before going for a hunt as there are numerous guns available in the Borderlands 3.
The world of Borderlands 3 offers a wide variety of gaming experiences, especially for gamers who love aggressive gameplay. There are more than 2 Billion weapons in the world of Borderlands 3 that makes it the best RPG game amongst its lineup. Thus, the aspect of Loot Tink is a great one as it allows the gamers to obtain their favorite legendary weapon.
Conclusion
The primary motive behind this article is to provide the information of Borderlands 3 to the gamers. The information is mainly based upon its aspect of Loot Tink alongside we have specifically brief out ways to farm Loot through Loot Tinks. The process in the article is simple but complicated, so it is advisable to be aware while reading it to avoid making any sort of mistake. In the end, we believe that the gamers will find this article useful and successfully accomplish their purpose through it.
The gamers who haven’t try the gaming experience of Borderlands 3 can obtain it through Google Stadia, PCXbox One, and PS4.
Daniel Ryan is a creative person who has been writing blogs and articles about cyber security. He writes about the latest updates regarding norton.com/setup and how it can improve the work experience of users. His articles have been published in many popular e-magazines, blogs and websites.
Exploiter Orb is the toughest boss in game that is hard to find and hard to kill. That is why an essential guide needs to kill him to earn huge rewards. Warframe has numerous missions that players have to complete. In the game, various types of enemies available, and each enemy is of different levels, but you have to defeat every one of them. Warframe is a multiplayer game where to defeat the opponent, and you need to focus on your teamwork to destroy everything. Exploiter Orb not like any other enemy, and that is why killing this boss requires additional guidance and tips to progress.
Look out for Exploiter Orb in Warframe
Exploiter Orb most likely to found out in Orb Vallis, and the best thing to do is go with teammates and fight with the help of them. Before going there, required to have the Diluted Thermia; otherwise, utilizing the console calls will be not be accessed at the time Exploited Orb comes in battle. Diluted Thermia can be obtained through the operation of the “Buried debts” challenge that you need to look out the schedule of it.
After reaching on Orb Vallis, you need to go to the northeast side of Harindi Carter for finding a cave that is an abandoned station. After entering the cave, you need to follow the path of Deck 12. Jump on the upper left level of the dock 12, and their console is located. In that place, you can activate the Diluted Thermia by calling the Exploiter Orb.
First Phase Fight with Exploiter Orb in Warframe
In the first phase, you need to destroy several Orb’s vents to defeat the Exploiter Orb. After destroying these vents real battle with Exploiter Orb will begin. There, one vent of Orb will fall down, and after that, you need to run towards the end of the room and teammates required to destroy two more vents. These two are the frozen vents, and players need to search for the Thermia Canister for going forward to dispensers on the map. At the time of throwing the vents, you need to fight against the enemy group too.
After destroying every vent, Orb will raise up itself to the middle of the room. There Coolant Raknoids will come out that players have to defeat while dodging through the Orbs attacks. Dodging is the best thing you could be at that time. Defeat the Raknoids and go back to the first vent location that you destroyed. When each and every vent is destroyed, the first phase level will be over by leaving the Deck 12.

Second Phase Fight with Exploiter Orb in Warframe
This phase is different, and for this phase, players have to leave Deck 12 and move forward to Orb Vallis. In this phase, players have to do hunt and battle with Exploiter Orb. There you need to create overheat, and then Exploiter will call Coolant Raknoids to cool it down. After defeating the one, coolant canister will fall, and that will lead to the Thermia Fractures. The Thermia Fractures will call randomly into the field, and these are required to fill the blue canister. After dropping them into fractures, the canister will turn into yellow color and throw these yellow canister on Exploiter Orb to turn it into overheat.
Final Phase Fight with Exploiter Orb in Warframe
Exploiter Orb will begin to overheat, and when it’s done, you and your teammates need to jump on the Orb, and then an additional cutscene will show up where the enemy opens up its engine. Now you and your teammates need to shoot at the engine continuously until the flames start to begin. If you put heavy damage on the enemy, you will able to make his start fire coming out.
With all these keep defeating the Coolants Raknoids, utilize Thermia Fractures to recover the canisters. Along with it, throw it on the Exploiter Orb and shoot at the engine together to defeat the boss. After defeating it, there will be much loot available because of it a boss blast in the end, and it kills everything that comes within its radius.
Daniel Ryan is a Norton product expert and has been working in the technology industry since 2002. As a technical expert, Daniel has written technical blogs, manuals, white papers, and reviews for many websites such as norton.com/setup.
First-person shooter games were known as “Doom Clones” back in the ’90s, but most of the current gamers don’t about this term. Before 20 years in the software, changes in games and their design changed the whole concept. Since then, the growth graph of FPS games in shooting games, single-player games, co-op games, esports, and many more games has increased. Shooting games with FPS are like definite games that will have violence, and players clearly love these games. This new concept in game origin a new competition in the gaming industry through storyline, action, imagination, and reflexes. There are several FPS games have made in past years and here is the list of top FPS game.
Best First-Person Shooter Games
1- DUSK
Dusk is one of the highest popularity games in the category of FPS games. It released in 2018 and set several records after the release. Some players might say the thing that FPS games are not that popular, but they should check the response of Dusk in popularity. Players play Dusk because of its FPS gameplay, and that is what keeps players stick to the game. The storyline of the game is based on a horror story where several levels available that players need to progress.
2- Metro Exodus
Another game in the list of best FPS games is Metro Exodus, which is developed by 4A games in the year 2019. It’s a shooting game that is packed with terrific horror enemies, creepy guns, boisterous comrades, and Eastern European post-apocalypse. Even though it’s a shooting game, but players love more about it is its love moments about a man and a woman who love each other. There are plenty of amazing moments that exist in-game where wedding songs at the time of war, which is the loss of innocence. Shooting and violence much exist in the game, but other factors are also important as shooting.

3- Far Cry 4
Far Cry 4 is a popular FPS game, and its previous versions were also too great to recommend. It’s a shooter game in which plenty of other items are available in it. From raiding the base to buy properties, hang glide, and many more things are available in Far Cry 4. In the open world, there are numerous things that are possible to do, just like big games. All these things are together too Far Cry 4 into one of the best FPS games.
4- Half-Life: Alyx
Took a new concept in gaming with VR Half-Life: Alyx is a great game. Despite the fact, there are only three guns available currently, but still, players are love to playing it. Pistols, shotguns, zombies, and many more addictive things are available to make the game entertaining. Battle against monsters and with guns and comrades is smooth if it works in the right way. Half-Life: Alyx is a ground-breaking FPS game that releases in 2020, and most likely, it will grow more in the future.
5- Half-Life 2
After a decade of launching Half: Life 2 is still the best single-player shooting game. The storyline and interface of Half: Life 2 is so smooth that every player can play if they love shooting games. There are several items, weapons, bombs available in this Sci-fi game. It is the most addictive gameplay that players ever played. In the battle, you need to do face to face battle without having the option of defending yourself.
6- Doom Eternal
Doom Eternal is everything that players ask in a shooting game. Doom 2016 was just a warmup game, and this one is the real challenge for players. Aggressive killing, faster moves, amazing fighting action with reckless gameplay. Doom Eternal is currently among the top games in shooting and FPS that moves so fast. In the series of DOOM, it is the best edition of the game as per the gameplay, storyline, and graphics. There are multiple abilities, guns, combat moves, and many more interesting things are available that players should try.  
Daniel Ryan is a creative person who has been writing blogs and articles about cyber security. He writes about the latest updates regarding norton.com/setup and how it can improve the work experience of users. His articles have been published in many popular e-magazines, blogs and websites.
The famous social simulation game of Nintendo has been respawned recently into a whole new avatar known as Animal Crossing: New Horizons. The game is quite a week old, but still, gamers from across the globe are acclaiming it. As the game is a social simulation game and the on-going quarantine aspect in the world has led gamers to like it even more.
The game features and numerous aspects have been altered by Nintendo; hence only the name of the game has been retained from its predecessor. The world of a new horizon allows gamers to do numerous things in the game, such as exploringconstructingfishing, and sleeping. One of the major activity that is luring gamers a lot is to collect fossils. Thus, below we have accumulated all the information about fossils alongside ways and price of them.
About fossils
The collection of fossils in Animal Crossing: New Horizons is an amazing and entertaining activity. Besides, fun the activity is quite beneficial as it allows gamers to craft a dinosaur through it and later release it on your island. Alongside, the fossils can be sold to Tim Nook at a mind-blowing price as fossils are quite expensive and rare. However, it is up to players what the option they choose to avail of the fossils.

Price of All the Fossil available in Animal Crossing: New Horizons
The gamers need to know that they need to first initiate this process of collecting fossils by unlocking of the museum. Once the gamers unlocked the museum, then gamers have to obtain Blathers as it will inform them about fossils type and the dinosaur that can be built through it alongside its selling price. Here we have accumulated a list to notify gamers about the price of all the fossils in Animal Crossing: New Horizons.
  • Sell Triceratops Tail for 4500 Bell.
  • Sell Triceratops Torso for 5000 Bells.
  • Sell Triceratops Skull for 5500 Bells.
  • Sell T-Rex Tail for 5000 Bells.
  • Sell T-Rex Torso for 5500 Bells.
  • Sell T-Rex Skull for 6000 Bells.
  • Sell Stegosaurus Skull for 5000 Bells.
  • Sell Stegosaurus Tail for 4000 Bells.
  • Sell Stegosaurus Torso for 4500 Bells.
  • Sell Spinosaurus Tail for 2500 Bells.
  • Sell Spinosaurus Torso for 3000 Bells.
  • Sell Spinosaurus Skull for 4000 Bells.
  • Sell Shark Tooth Fossil for 1000 Bells.
  • Sell Sabertooth Tiger Torso for 2000 Bells.
  • Sell Sabertooth Tiger Skull for 2500 Bells.
  • Sell Quetzalcoatlus Left Wing for 5000 Bells.
  • Sell Quetzalcoatlus Right-Wing for5000 Bells.
  • Sell Quetzalcoatlus Skull for 4500 Bells.
  • Sell Pteranodon Left Wing for 4500 Bells.
  • Sell Pteranodon Right Wing for 4500 Bells.
  • Sell Pteranodon Skull for 4000 Bells.
  • Sell Plesiosaurus Tail for 4500 Bells.
  • Sell Plesiosaurus Torso for 4500 Bells.
  • Sell Plesiosaurus Skull for 4000 Bells.
  • Sell Parasaurolophus Tail for 2500 Bells.
  • Sell Parasaurolophus Torso for 3000 Bells.
  • Sell Parasaurolophus Skull for 3500 Bells.
  • Sell Pachycephalo Tail for 3000 Bells.
  • Sell Pachycephalo Torso for 2800 Bells.
  • Sell Pachycephalo Skull for 4000 Bells.
  • Sell Myllokunmingia for 1500 Bells.
  • Sell Megalocerops Right Half Of Body for 5500 Bells.
  • Sell Megalocerops Left Half Of Body for 4000 Bells.
  • Sell Megacerops Tail for 3000 Bells.
  • Sell Megacerops Torso for 3500 Bells.
  • Sell Megacerops Skull for 4500 Bells.
  • Sell Mammoth Torso for 2500 Bells.
  • Sell Mammoth Skull for 3000 Bells.
  • Sell Juramaia for 1500 Bells.
  • Sell Iguanodon Tail for 3000 Bells.
  • Sell Iguanodon Torso for 3500 Bells.
  • Sell Iguanodon Skull for 4000 Bells.
  • Sell Ichthyosaur Torso for 2000 Bells.
  • Sell Ichthyosaur Skull for 2500 Bells.
  • Sell Fossilized Feces for 1100 Bells.
  • Sell Eusthenopteron for 2000 Bells.
  • Sell Dunkleosteus for 3500 Bells.
  • Sell Diplodocus Chest for 4000 Bells.
  • Sell Diplodocus Tail for 5000 Bells.
  • Sell Diplodocus Lower Back for 4500 Bells.
  • Sell Diplodocus Neck for 4500 Bells.
  • Sell Diplodocus Skull for 5000 Bells.
  • Sell Dinosaur Track for 1000 Bells.
  • Sell Dimetrodon Skull for 4400 Bells.
  • Sell Deinonychus Tail for 2500 Bells.
  • Sell Deinonychus Skull for 3000 Bells.
  • Sell Brachiosaurus Tail for 5500 Bells.
  • Sell Brachiosaurus Chest for 5500 Bells.
  • Sell Brachiosaurus Lower Back for 5000 Bells.
  • Sell Brachiosaurus Skull for 6000 Bells.
  • Sell Australopithecus for 11000 Bells.
  • Sell Archelon Torso for 3500 Bells.
  • Sell Archelon Skull for 4000 Bells.
  • Sell Archaeopteryx for 1300 Bells.
  • Sell Ankylosaurus Tail for 2000 Bells.
  • Sell Ankylosaurus Torso for 3000 Bells.
  • Sell Ankylosaurus Skull for 3500 Bells.
  • Sell Anomalocaris for 2000 Bells.
  • Sell Ammonite for 1100 Bells.
  • Sell Acanthostega for 2000 Bells.
Daniel Ryan is a Norton product expert and has been working in the technology industry since 2002. As a technical expert, Daniel has written technical blogs, manuals, white papers, and reviews for many websites such as norton.com/setup.
A new version of Animal Crossing is out in the market and is attaining positive reviews globally. The time module aspects in Animal Crossing: New Horizons is one of the key features that connect the virtual world to the real world. As it makes it more holistic such as life. Now the game has migrated to April, and the gamers who have lost their chance of grabbing fishes and bugs must be regretting. In the new month of April, the game has enticed gamers with a new aspect, and it is of Wasp. Gamers who are unaware of Wasps are foes that lie on the trees and hinder the gamers from catching bugs. Below we have brief about specific ways to get away from Wasp.
How to Get Rid of Wasps
Once the gamers visited the island in search of bugs requires to be aware before shakings the stems of trees. As Wasps immediately fall upon and begins to sting them. The gamers require to use their Net to catch Wasps with it. Alongside, gamers can also use quick speed to dodge sting attack of Wasps. The best resort to quickly get away with Wasps is to access into a nearby building, Wasps will vanish immediately.
Gamers who are willing to fight with Wasps can purchase an item called Party Popper from the shop of Tim Nook. As the item is a vulnerability of Wasps, and they feel sacred to deal with it. Although, the gamers need to be more aware and they can easily get away with Wasps as they seem out difficult to handle, but with a strategy, they can be dodge or catch easily. So, all the gamers should choose which option they would like to go with to get rid of Wasps and make a specific strategy according to it. It is also recommended to use a good tool for shaking of trees as fast shaking will trouble Wasps.

Conclusion
The article here is to provide information about Nintendo’s new game, Animal Crossing: New Horizons to the gamers. The article will feed the gamers about Wasps and ways to get rid of them. The information in the article has been taken from the internet, so we are pretty grateful to it. In the end, we suppose that you will probably like this article and will achieve your purpose through it.
The gamers who are not aware of the gaming world of Animal Crossing: New Horizons should witness it through Nintendo Switch.
Daniel Ryan is a creative person who has been writing blogs and articles about cyber security. He writes about the latest updates regarding norton.com/setup and how it can improve the work experience of users. His articles have been published in many popular e-magazines, blogs and websites.
Windows is undoubtedly an efficient OS, but its productivity increases several folds when it is activated. The activation process is simple, as you merely need to redeem your 15-digit activation code on the setup menu. However, there are instances when you might be faced with the error code 0xC004C008. This error code mainly occurs when you install any Windows product several times, as the Windows license only allows to connect a single device.
If your operating system is crashed and you have bought a new device, then you need to install new Windows, change your hardware, and a new activation code. In this article, we will teach you how you can fix Windows 10 Activation Error Code 0xC004C008 with three methods.
Windows 10 Activation Error Code 0xC004C008
  • Using Phone Activation
  • Using Windows Activation
  • Contact Microsoft

1) Using Phone Activation
Here are the steps on how to use phone activation to fix windows 10 activation error code 0xC004C008:
  1. Tap and hold Windows + R key to launch Run Windows, (You can also use start option top run Windows in Windows 10 operating system).
  2. Type SLUI 4 command in the Run Windows.
  3. Tap Enter key on your keyboard.
  4. Here you can see a “Phone Activation Window” on the front of your screen.
  5. In this Window, you have to select the country in which you are enrolled.
  6. Make a call on the activation number when you have selected the country code.
  7. After this, you can see a notification on your screen that asks you to enter your Installation ID.
    1. Remember that you need to enter the installation ID into your phone.
  8. After entering the installation ID, you can be asked how many windows licensed to install on your device, and you need to select 1.
  9. If you select any other option, then it is not work in your device.
    1. Remember that option 1 select means you can use it once only.
  10. After the above process, you get the confirmation ID then you can ready to go along with the workable product key.
2) Using Windows Activation
Here are the steps on how to using Windows activation to fix windows 10 activation error code 0xC004C008:
  1. Tap Windows + I key to launch windows settings.
  2. Go to bottom and search Updates and Security option and then tap on it.
  3. Start Activation option.
  4. Tab on the troubleshooting features, and then you need to wait for a couple of minutes until the process complete.
  5. Check the issue is resolved.
3) Contact Microsoft
If the above methods cannot fix your operating system, then you need to contact the developer. You need to dial toll-free number 18009365700 to talk to Microsoft and explain the error you have facing on your device.
Daniel Ryan is a Norton product expert and has been working in the technology industry since 2002. As a technical expert, Daniel has written technical blogs, manuals, white papers, and reviews for many websites such as norton.com/setup.
Source: Animal Crossing New Horizons: How to Make A Spider-Island

Nintendo’s Animal Crossing has finally arrived after so much anticipation. The game has been praised by the gamers a lot. Due to numerous aspects that have been added to it alongside various Nook’s task. The game is spread into a wide and large area; thus, it comprises numerous animals residing on various dense forests and Islands.
The most greeted aspects of the game are to craft the island of their own. The gamers can make bridges, stairs, and many more structures on islands. Several popular gamers have shown throw live streaming about how to build an Island into Spider-Island. If you have missed out on their live streaming, then you don’t have to worry as below we have manifest specific steps to brief you out about spider island. Alongside ways to build it, the process is a bit complicated, so it is suggested to be aware while reading this article to avail of the possible result.
Craft a Spider-Island
The gamers first need to know that the following task will require a Shovel to cut down all the tress from the island. Once the gamers have successfully obtained a shovel, then they need to use it to deplete the forest of the subsequent island. The following process also requires the players to plunk all the flowers, deplete all the rocks and captured all the bugs. Once the gamers completed all these tasks, then they need to clean up the beach. Once they remove all the junk and garbage from the beach, then they need to wait for a couple of hours as Spiders will appear after 7 pm.

The gamers who are unaware of the fact that spiders are a gem of gold in Animal Crossing New Horizons. Most precisely, one spider will sell out for 10,000 Bells, so it is advisable for every gamer to accomplish this task to earn numerous wealth in the game. However, there are various other ways to earn bells in Animal Crossing New Horizons, but making a spider island is one of the most efficient and simple ways among the rest of others.
Gamers can use the feature of time-traveling to remove all the obstacles from their island instantly and can go to the future to grab Spiders. It’s the player’s choice whether they go upon through easy way or hard, but it is recommended to accomplish the task of spider island as it will benefit the gamers a lot.
Conclusion
The article here is to help the gamers about Animal Crossing New Horizons’ task of making a spider island. The following information has been derived through the Twitter account of popular gamers. We hope that the article will favor you in completing this task.
Gamers who are still unaware of the virtual world of Animal Crossing New Horizons can obtain their experience on Nintendo Switch.
Daniel Ryan is a creative person who has been writing blogs and articles about cyber security. He writes about the latest updates regarding norton.com/setup and how it can improve the work experience of users. His articles have been published in many popular e-magazines, blogs and websites.
In iPadOS version 13.4, attacHow to Use a Wired Mouse With an iPhone or iPadhing a mouse into an iPad is straightforward. Finally, you can attach Apple Magic Mouse II without performing any settings. It is vital to use an external keyboard and mouse while working on Word, Excel, or PowerPoint via your phone. In this article, we will teach you how you can attach your mouse on the iPad.
1) Settings a Bluetooth Mouse Within iPhone and iPad
The most straightforward method to use Magic mouse into an iPad is settings or Bluetooth. You only need to Accessibility the list to access to pair few individual Bluetooth mikes and Apple Magic mouse II. You can also use it with a regular Bluetooth subsystem.
Alternatively, if you wish to use your mouse into your iPhone, then you need to use third-party application. Remember that the Apple Magic Mouse II doesn’t show to work always. You can only access Magic mouse when you pair Mouse 1 when you follow all the steps that have been given below in this article. In these steps, also see how to settings a wired mouse with an iPad or iPhone. You also need to use a pin to pair your mouse with your iPhone or iPad, which is a preview as 0000.
First, you need to make sure that your mouse has unpaired with your Windows PC or MacBook. If you want to attach on MacBook, the follow the given set up on your device:
  1. Visit the Settings application on your MacBook.
  2. Tap Bluetooth.
  3. Here you need to sure that Bluetooth toggled that appear on the top of the screen as a green toggle.
  4. Insert your mouse to attaching mode. If Magic Mouse II is Unattached, then you need to turn off, and again preview appears on the screen.
  5. You have to check you device popup in the notification in the Bluetooth subsystem that is also called other device.
  6. Tap the name of the device that you are using.
  7. You maybe got a Bluetooth pair request when you tap to pair.
  8. Now your mouse rapidly starts working, and you can view in your device as moving the circular pointer on your screen.
You can also change mouse experience by visiting settings, then general and then Trackpad and mouse. Here you can easily change the tracking speed of the mouse and also select secondary Click that appears on the left or right of the screen. Here you can also switch off the Apples “Natural scrolling” that are not finding personally.

2) Setting Wired Mouse on Your iPad
Users also use wired mouse into the IPad or iPhone, but there setting is more awaked and considerably that Bluetooth. One more thing, you need to give more time instead of attaching a mouse with Bluetooth. Besides the optical mouse to do anything’s with the iPad Pro and you get a notification on your screen as shown (Gaming Mouse G50II: This accessory requires too much power)
You can also change the mouse tracking; here are the steps on how:
  1. Visit the settings on your device.
  2. Then tap on the General.
  3. Here find Trackpad and Mouse, tap on it.
  4. After this above process, you can track your mouse tracking speed via using Secondary click.
3)   Setting Wired Mouse on an iPhone
  1. Launch the setting application.
  2. Scroll down and find Accessibility and then tap on it.
  3. Hit Touch section.
  4. In this menu list, you need to find the item for Assistive Touch on the top, and it will be read of you need to tap it to on
  5. Then you need to visit the menu.
  6. Here turn on the Assistive touch via the toggle that appears on the top of the screen (it will be shown as green).
After this above process, wired mouse will be attached to your iPhone and start basically as work on the iPad. You can also track your mouse pointer speed by the given settings.
Follow the steps to track the pointer speed by secondary click.
  1. Visit the settings.
  2. Tap on the General.
  3. Find Tacckpad and mouse.
  4. Here you need to turn off the secondary click.
Daniel Ryan is a Norton product expert and has been working in the technology industry since 2002. As a technical expert, Daniel has written technical blogs, manuals, white papers, and reviews for many websites such as norton.com/setup.
Source: How to Insert a Picture Inside Text in PowerPoint

PowerPoint is a broad collection of presentation tools and dynamic features to create spectacular presentations for exhibitions and performances. A PowerPoint presentation includes pictures and text, both having artistic features. Filling images into text is a great idea, but for some users, it’s a difficult task.
Fill for text effect mesmerizes everyone as it throws a dynamic appearance on the viewer’s mind with magnificent color combinations and various textures. A rich slide contains various cool stuff and presentation graphics, including pictures and text, but if you combine pictures and text into one place, the appearance becomes a spectacular one.
Advantages of Inserting Picture into Text
  • It attracts the audience to your presentation and makes it appealing.
  • It also throws out a boring image of black letters that are used usually.
  • It allows the user to modify the text appears on the basis of their choice as there are various color palettes and texture are available for changing color schemes.
  • Users can select Word Art to customize the style of the text to make it worth attracting.
Filling Text with Pictures
If you are planning to use the image for filling into the text, you should be very careful and ensure these specs:
  1. Customize the desired text in the bold alphabet. For example Broadway and Arial Black
  2. Make sure that your text has thick lines so that you can see the image effect in your picture. The thicker the text, the more appealing your image formation.
In case you wish to use your image as fill for text effect, then abide by these instructions:
  • In the beginning, launch a PowerPoint presentation slide on your device having text effects.
  • Then, choose your desired text into the slide.
  • Now, hit the Drawing Tools Format.
  • Next, tap on the Word Art section for selecting your desired text format.
  • Now, hit the Text Fill pull down tab and hit the Picture option there.
  • Navigate towards the area of the “Insert Picture” dialog box and select one of the given images options.
Note: In case you are using PowerPoint 2019, then select your desired image from File section, Online Pictures, and by navigating the From Icons tab.

Selecting Image from System Memory
  • In case you are selecting an image from your device, then hit the option “From a File” and select your desired image file.
  • Once you have selected the image that you want to insert, hit the “Insert” tab.
  • After a while, your image will be inserted into the selected field.
Inserting Image from Web
In case you wish to put your desired image from the web, then follow these offered instructions:
  • First and foremost, choose any of the search engines for your image such as Bing Image search, etc. and enter the title of your wished image followed by entering the key. For instance, we have entered “tie-dye.”
  • A list of possible images will appear on your screen, and you have to select your desired one. Scroll down for more images at the lower sections.
  • When you have searched your desired image, then hit on it and tap the Insert button to proceed.
Note: For avoiding copyrighted pictures, it is recommended to leave the option “Creative Commons Only” features.
Inserting Pictures from OneDrive
If you want to take your desired image from the OneDrive folder and directory, then you can do so by going through these mentioned guidelines:
  • At the start, choose the option “OneDrive.”
  • Then, hit on the “Personal” option.
  • You have to select the option “From a File” if you are using PowerPoint 2019 version.
  • Now, look for your desired image among folders and files where you have stored them under OneDrive.
  • When you have got your desired image that you are searching, hit on it, and then choose the option “Insert.”
  • In case, you have inserted a wrong picture by mistake that you won’t need to put into the text, then move backward or undo your action by hitting the “Ctrl” and “Z” keys simultaneously.
  • Then, select the perfect picture of your choice.
Daniel Ryan is a creative person who has been writing blogs and articles about cyber security. He writes about the latest updates regarding norton.com/setup and how it can improve the work experience of users. His articles have been published in many popular e-magazines, blogs and websites.
Division 2 has released the new season in which they have added several things along with finding Neptune. In the new season, there are five deadly bosses and a giant manhunt available for hunting down. All five bosses are Neptune, Venus, Mercury, Saturn, and then Jupiter. Among all these bosses, Jupiter is the final and most deadly boss. Getting the rewards from manhunt this season will give you three weeks’ time, which is more than enough time to achieving such a thing. In season two types of rewards are available that players can achieve. Among two rewards, the first one can be achieved by almost every player, but another reward is a premium reward in which skins, extra loot items, and vanity items are available.
The new season of Division 2 will keep manhunt going three months, and currently, their primary focus on hunting the boss Neptune. There are several rewards that are available, and even if you level up, you can get some exclusive piece of rewards. In the premium rewards, some items are extraordinary that every player can’t obtain. However, you can earn extra rewards by playing events like Global Events and League Play during the hunting of Neptune.
Unlock Neptune in Division 2
In order to unlock Neptune, there are four investigation stages available that need to be finished. There is no particular order given to complete these investigation level, so you can choose and play any of them among the four. While doing the stages, remember that you need to finish these levels in the same difficulty.

There are issues in the process, so if you change difficulty in the middle of it, you might see “haven’t done a message” on display. So just try to play on same difficulty settings for saving your progress until the issue is solved. Timing also matters during the investigation. You need to be rapid and specific on your timing while doing the investigation.
All four investigations are happening in different locations, and these following locations are West End, Roosevelt Island, Foggy Bottom, Constitution Hall. Control points are essential to get you to investigate every location and also bounty needs to be complete with Roosevelt Island, which is the only exceptional location. After completing the bounty missions of investigation, Neptune will be unlocked. While battling with Neptune, just remember there are no other activities and patrols available to interrupt at the battlefield because it could make your battle tough to win.
While battle uses your Launcher Riot Foam and the Striker Drone for deal more significant damage. It is because you can’t get close to Neptune quickly because he runs around a lot. You can only damage Neptune, but if you can stop him, it can make your battle easier against him. Winning against him cannot be easy until you use your launcher attacks or stop him in a single place. While battling with him, remember these guides on the battle to win faster.
Daniel Ryan is a Norton product expert and has been working in the technology industry since 2002. As a technical expert, Daniel has written technical blogs, manuals, white papers, and reviews for many websites such as norton.com/setup.
Android 11 comes with an improved user interface and warnings for certificate management. Here is why it matters so much and how you can disable it.
Android 11 will now come with an improved user interface and warnings for certificate management. The step could be seen as the response to the cropping up of various controversies regarding data harvesting in recent years. The disputes involved the companies that use root certificates for collecting and tracking data from smartphones. It has been allegedly said that federal law enforcement and government agencies might be involved in monitoring the data of the users with some analytics tool that collects the data from mobile applications. Meanwhile, the consumers are concerned about the occurrence of data harvesting cases and reports related to it nearly every month.
The consumers are willing to know what type of data is collected by the apps and which apps are collecting their data. Amidst all, even applications such as ad-blockers and VPNs have also started to lose the trust of consumers. Yet though the apps such as VPNs are known for a firewall for privacy. For instance, according to an investigation which was done recently, it was found that at least 20 ad blockers and VPNs application, which was available on both iOS and Android, was involved in sending online information regarding the famous analytics Firm, Sensor Tower. It was also highlighted in the investigation of how these applications were using the privileges of root certificates for gathering the online information of the users.
Now, Electronic Frontier Foundation has reported that looking into the new cases of data harvesting, Google is rolling out improved warnings and user interfaces for certificates to protect the privacy of the users. However, the option for disabling the root certificates was already available for users previously also. Still, the improved user interface will help them to get the warnings in a more explicit language. The latest updates have removed the word of the weak warning, and now the users will get a clear signal which is backed with standard risk symbol also.

How to disable root certificates, and what can they do?
If the users are installing a new root certificate manually, which is other than the trusted ones that your browser or OS accepts and that too at the request of a website or an app developer, then you are at high risk.  The installation of root certificates in such a way can provide access to the complete online information of the user to the service or app owner, bypassing encryption rules. On the other hand, the installation of trusted certificates is always helpful in detecting malicious activities done by any application.
The Android users can, fortunately, have the option to disable the root certificates even if they installed them. They need to follow straightforward steps by going to the Settings. Then the users will need to choose the option Security after the users can disable the unnecessary certificates manually by selecting the option Trusted credentials. Apart from this, the current step taken in changing the policy regarding root certificates will further pressurize the big players such as Microsoft and Apple to bring more transparency by improving the access and warnings of root certificates.
Daniel Ryan is a creative person who has been writing blogs and articles about cyber security. He writes about the latest updates regarding norton.com/setup and how it can improve the work experience of users. His articles have been published in many popular e-magazines, blogs and websites.
iPhone devices are the most preferred and appealing devices, especially when it comes to privacy and security. People who use the iPhone know what it’s like to be secure from so many unwanted things. Apple is committed to the privacy of its users, and that is why they don’t share the details of their users with anyone. They also have their own browsers and mail features that keep the user keep out from the crowd. People who use Android devices also want privacy like the iPhone, but unfortunately, they can’t have it because the iOS operating system only works on the iPhone.
Privacy matters to everyone, even if the user is using an Android device. That is why there are some processes and steps that will increase the privacy of the Android device too. It’s true that Android devices send up to 10 times data to the Google server, whereas the iPhone does with Apple. All this is possible in the iPhone is because of its numerous privacy options that secure the data of the user. However, if you want to make your Android device more secured then you need some tips to increase your privacy. There are some additional changes that you need to make in your Android to enhance its privacy level. Here’s how:
1. Discard Google Chrome and Try Brave or Firefox
In every Android mobile device, Google Chrome is available by default. That is why almost every user uses Google Chrome instead of any other browser. But you might not know that Google Chrome is the one that shares most of your information. Google Chrome is one of the most popular browsers, but that doesn’t mean other browsers are not that secure or useful. In the iPhone “Safari” browser is available, which is one of the most secured browsers made by Apple. For Android devices, Safari is not available, yet you can be more secured without using Google Chrome.
Instead of using Google Chrome, you better use Brave or Firefox that does not share much data as compared to Google Chrome. It’s possible that you can save restrict sharing your data by using Firefox and Brave browser. Both of these browsers do not share your data with other third parties. These browsers have advance tracking data protection available that does not let the websites get your data without permission and block those sites to get the data.
2. Use Third-Party Messaging Apps for End-To-End Encryption
To be fully secured, Android users need to have a secure messaging app. Well, in current Android devices Google is providing its own messaging application as default. It’s easy and simple, but there is no privacy in the Google messaging application. The default messaging application of Android is not end-to-end encrypted, and that is why many third parties can get the information from it.
In the Apple iPhone device, the messaging application is totally secure that even Apple does not have details of it. There is also the iMessage feature available, which is not available in Android. To get proper security in Android you need to use to a third party messaging browser instead of using default Google messaging application. In third party end-to-end encrypted messaging app, your conversation will be safe, and Google will not be able to read it. Either you can use WhatsApp to get end-to-end encryption.

3. Depot Gmail to Use Another Private Email
Gmail is the application of Google, which is default available in Android devices. There is no denying that Gmail is stable, but it cannot provide the privacy that users require. Google admits that Gmail does not scan the files, but whenever you share any file, it scans for an unknown purpose.
Whereas iPhones have their own mail, which is iCloud mail service. The iCloud mail service does not scan any document you share neither it collects the data of any user. It’s a great service that apple provide thought its apps, and to get these kinds of service you need to stop using Gmail service. You can make your iCloud mail and can use it in your Android in the Gmail application. Your iCloud mail will not be scanned, and your data will be secured.
4. Max Your Google Maps Privacy
Without any doubt, Google Maps is superior service in the Android device. Apple Maps are also great, but nothing in comparison to Google maps. The only thing Apple Maps are ahead is its privacy, whereas Google Maps are far behind. Google maps track you every step provide several more features more than Apple Maps. In the face of Privacy, Apple Maps are ahead, but users cant install it in the Android device, so in that condition, enhancing privacy is a tough thing but not impossible.
To make Google maps more private and secure, you need to max out the privacy in the settings to stop Google from collecting your data. In the settings of Google Maps, go to “Your Data in Maps” of your account. Tap on the “Location History” and pause sharing your location history. Google will stop collecting your location wherever you will go. Then you need to go to “Activities Controls” from your Google Account to pause your “Web & App Activity.” From this process, Google will no longer track your steps, and you will get some improved privacy from before.
Daniel Ryan is a Norton product expert and has been working in the technology industry since 2002. As a technical expert, Daniel has written technical blogs, manuals, white papers, and reviews for many websites such as norton.com/setup.

iPod is a vast series of movable media players that work as multimedia players in the form of your pocket device. iPod is designed, developed, and circulated by Apple. The first edition of the iPod was introduced after a few months of the release of Macintosh edition of iTunes came into the digital market. It runs on iTunes software of Apple that can be summarily used for moving images, movies, videos, contact data, and much more. The primary feature of the iPod is to provide various music for its users, and today it is coming in many variants having large storage capacities.
Transferring data such as music from an iPod to your PC or laptop seems a very complex task as you wish to transfer your favorite songs from your iPod that you have stored on it. It becomes a more complex one if you wish to mix and match various tracks from previous days having your existing device location.
Here, we are going to provide you best of the transferring tricks for your desired songs from iPod to your Windows desktop.
Setting Up Apple Device to Your PC
  • First of all, you need to check for all the software and your Apple device, whether it is working properly.
  • After that, download iTunes on your PC and even on Mac computer running on Catalina edition.
  • Next, ensure to install the recently updated version of your system’s OS.
  • Then, make sure that your smartphone is also updated to the latest version.
  • Now, try to connect your device to the PC via USB cable. A prompt will appear, then you have to hit the appropriate option there.
Note: Sometimes, some 3.0 USB ports didn’t work smoothly on older models of iPods.  In this case, you are requested to try USB 2.0 in this place.
  • Once you have performed all the instructions mentioned above carefully, then follow these instructions to transfer your music to PC:
Transferring Music Files by Using Sync Library Feature
This feature works smoothly to control all your songs through the iCloud library. It’s one of the big advantages of Apple to enforce its devices to use the feature. There is one downside of this feature; it can only be used on newer Apple gadgets through Apple Music.


It won’t work if you have an iPod model earlier to iPod iTouch. This feature even works, having your device is disconnected to PC. The most important feature of iTunes that it syncs your music files automatically on your synced devices.
  • First of all, navigate to the Settings application of your iPod.
  • Then, hit the option Music and enable Sync Library feature.
  • Next, launch the Music app on your system and press the Music section there.
  • Tap on the “Preferences” option, and after that, activate the feature that is located just beneath the tab “General.”
Note: In case you haven’t subscribed to your device for Apple Music, then you will not be able to view other options.
Bringing Back All Your Past Purchases
In case you wish to access songs and music tracks you have purchased from iTunes Store, then you can install earlier music purchases on your Mac or PC even if you haven’t subscribed to Apple Music. The process is so simple for both Mac and PC desktops:
  • In the beginning, hit the Account option.
  • After that, tap on the “Purchased” section. It will launch the music window that you made purchase some time ago.
  • In case you wish to fetch other songs that are not stored on your system or device’s library, then tap on the “Not in My Library” option. It will be located at the top area of the expanded page. This action will fetch you all the music tracks that are not stored on your system.
  • Next, hit the Cloud shaped symbol to download all the available music albums in your music library. This icon will be located at the top right-hand side edge of your album page.
  • Ensure to have a strong internet connection as it may take some extra time to process the operation.
  • Once the download finishes, all the selected albums will be stored in the music library.
  • There are multiple applications available on the web to which you can take assistance to manage all your media, including music on your Apple gadget. These applications work on Mac and PC both for your compatibility with ease.
Daniel Ryan is a creative person who has been writing blogs and articles about cyber security. He writes about the latest updates regarding norton.com/setup and how it can improve the work experience of users. His articles have been published in many popular e-magazines, blogs and websites.


Source: Galaxy S20: How to Use Wi-Fi Calling, Caller ID Protection & PowerShare

Samsung Galaxy S20 has been released with several features that are relevant and facilitate technical help in their daily life. In this article, we will teach you three special features on Galaxy S20. First, how to enable Wi-Fi calling, the second how to protect call from robocalls, and third how to use PowerShare to charge another device.
1) Wi-Fi calling
Cellular signals are overfilled nowadays, and there are significant issues in the home network where you can get the network on your device. Because of cellular network issues, you can’t receive a call on your phone and receive any cellular activity. If you want to solve this issue, then you can use Wi-Fi calling on your Galaxy S20 phones to connect with others. Here are the steps on how you can enable Wi-Fi calling on the Galaxy S20:
  1. Launch the settings on your phone Home screen.
  2. Click on Connections.
  3. Toggle on of Wi-Fi calling on your screen.
  4. If you can see the Wi-Fi calling on your device for some reason, then you can also enable from the Galaxy’s S20 dialer.
Here are steps on how to enable Wi-Fi calling in Galaxy S20 dialer:
  1. Launch the dialer on your phone Home screen.
  2. Hit the overflow menu shown as three vertical dots on the right of your screen.
  3. Select settings.
  4. Toggle On to Wi-Fi calling.
Lots of carriers are offering Wi-Fi calling globally, and it makes a big difference to audio calls. Wi-Fi calling rolled earlier this year, and the main difference immediately noticeable. Now, whenever you are calling a normal call, you might feel to connect with string. So go ahead and start Wi-Fi calling from your device to use these new features and get a good quality of audio.

2) Caller ID Protection
Robocalls are the major nuisance for every user. But thanks to the Galaxy developers who have brought services to weed out robocalls and block unwanted numbers. The Galaxy S20 has robocalls protection features stored into the dialer.
Here are the steps on how to enable caller id and robocalls protection on the Galaxy S20:
  1. Launch the dialer in your Galaxy S20 Home screen.
  2. Hit the Overflow option that appears on the right of the screen as three vertical dots.
  3. Select Settings.
  4. Toggle On “Caller ID and robocalls protection.”
  5. Read the privacy and policy and then choose the Boxes.
  6. Tap Agree to confirm your task.
The Samsung Galaxy S20 has a robocalls features power by the Hiya, a treachery detection service, and also phone number verification service. Hiya, work with the device to find robocalls. This service will start from $15 for one year, but the Samsung user can utilize this service for free because this is an inbuilt feature on the Galaxy S20.
3) Use PowerShare
Wireless PowerShare is an excellent feature that introduces the Galaxy S20 to charge another device wirelessly. This feature is specially designed for the other device that you are using along with your Galaxy S20 like Galaxy buds and Galaxy Watch Active 2. Here are the steps on how to use wireless PowerShare wirelessly to charge another device from Galaxy S20:
  1. Swipe down the notification center on your device Home screen.
  2. Once more, swipe down to display all the quick option.
  3. Choose Wireless PowerShare.
  4. Take another device on the back of Galaxy S20 to charge wirelessly.
You need to put your device on the back of the Galaxy S20 center because the charging coil is located in the center of the Device. For the Galaxy buds, you need to remove the case of your device and start charging. And one more important makes sure your Galaxy S20 charged up to 30 percent. If your Phone battery below 30 percent, then you are not able to charge another device.
Daniel Ryan is a creative person who has been writing blogs and articles about cyber security. He writes about the latest updates regarding norton.com/setup and how it can improve the work experience of users. His articles have been published in many popular e-magazines, blogs and websites.
As we know, the 0x80244018 Windows Update issue is similar or kind of HTTP status 403 error. Such bug check value means the server gets the request, whereas it fails to continue and send the documents. This error normally arises while installing a feature update or an update. Conversely, to fix this error is not a tricky job. This guide will help to get rid of window update error 0x80244018 code in the flick of seconds.
Method 1:  Get Rid of Antivirus Tools
Since third-party antivirus tools and users might occur, the 0x80244018 error Windows update needs to step up and turn off them. If turning off does not work, then you should remove it. Also, you will need to know that uninstallation will not resolve the problem permanently. Users require to utilize the antivirus tool from the developer’s site to eradicate traces.
Similarly, the proxy VPN is evenly dangerous; therefore, uninstall if your device has any. Windows operating system has its own defender that can resolve your issue. For that, here are some steps that you can use to uninstall antivirus tools easily.
  • First and foremost, go to the Start menu available on the taskbar.
  • On the succeeding menu list, tap on the search bar.
  • Type Control Panel in the required box.
  • Now, choose the best match from the following list.
  • On the Control Panel window, tap on the Programs.
  • Select Programs and Features icon from the window.
  • A list of installed programs will come out.
  • From the following list, tap on the antivirus tool accordingly.
  • Go to the Uninstall option once selected the antivirus program.
  • At last, follow the onscreen prompts and uninstall it completely.

Method 2: Check BITS Working on your system
BITS is one of the essential components of the Windows system that provides the update. Error 0x80244018 windows upgrade error shows up when a malfunction arises in this. To ensure, BITS is working without any complications, that check out the given step and overcome the problem in the blink of seconds.
  • To begin with, tap on the Win + X button on your console.
  • After that, click on the empty box and type service.msc.
  • Hit the Ok or Enter button.
  • On the following window, search for the Background Intelligent Transfer service.
  • Once found, right on it and hover your mouse to the Properties section.
  • Now, a window will pop out on your screen, showing properties.
  • Tap on the Startup Type tab.
  • Scroll down a bit and choose Delayed Start (Automatic).
  • Then, head towards the Service Status tab.
  • Set it to the Start part.
  • Once done, reboot your system.
Conclusion
In Windows 10 operating system, upgrading the features is essential to improvise the functionally and better experience. However, some of the errors like the 0x80244018 Windows update error prevents people from downloading the updates. So, the solution, as mentioned above, is very effective that can resolve this annoying error without making too many efforts.      
Daniel Ryan is a Norton product expert and has been working in the technology industry since 2002. As a technical expert, Daniel has written technical blogs, manuals, white papers, and reviews for many websites such as norton.com/setup.
Source: iPadOS 13.4: How to Install Developer Beta 3 for iPad

Apple recently released a new beta 3 update of iPadOS 13.4 for developers. If you are a developer, then you can install it for checking out changes, new features, and many more. Apple releases updates for every model so the users can use the latest features and explore new things that the company releases. In the world, users of iPad devices are numerous, and they all get the update at the same time.
The company releases beta versions early so developers can check and explore new features. New updates keep the device secure and performance fast too. So for installing the iPadOS 13.4 betas, first you need to take the backup of your device, and then you can install it in the straightforward procedure:
Make an encrypted backup of iPad
It is true that the beta update released by Apple, but there could be bugs in the beta version. The company knows about it, and that is why firstly, they release a beta version to find out all the bugs from the software and to check new features of how they are working. So if you have anything personal and important data in your iPad device, then you should take backup for security purposes. Make sure you keep your backup archived so no one will be able to access it except you.
  1. “Connect” your iPad with Mac or Windows PC with cable.
  2. Start “iTunes” for taking backup and make sure its updated version.
  3. Tap in “Trust” option on your iPad when will ask for Trust and Don’t Trust.
  4. Tap on the iPad “icon” in the upper left side after it appears.
  5. Scroll down and choose backup in “This Computer” with “Encryption” enable.
  6. Press on “Backup Now” and then type a strong “password” for encryption.
  7. Take a backup of “Apps” if iTunes asked for it.
  8. Now in the menu bar, choose the “preference” option.
  9. Press on “Device.”
  10. Choose your latest iPad backup for Archive.
Backup can be overwritten, and that is why the Archive keeps preventing your data from overwriting for any reason or mistake.
How to Install iPadOS 13.4 Beta 3 in iPad Using iTunes
  1. Type developer.apple.com in the address bar in your Mac or Windows PC.
  2. Press on “Discover.”
  3. On the top of the screen, find and press the “Operating System buttons.”
  4. Press “Download.”
  5. Verify with your developer “Username and Password” by the login.
  6. Move to the iPadOS beta version column and “Download Restore Images.”
  7. Tap on “iPadOS restore image” that similar to the device you plan to install.
  8. Press on “Applications” on top of the list related to beta software.
  9. Press “Download” near to “Xcode 11” and wait for completing Download.
  10. Run “iTunes.”
  11. Connect “iPad” with your Mac or Windows PC.
  12. In iTunes, tap on the iPad icon that shows up after connecting.
  13. Tap the password of the iPad for accessing.
  14. Tap on Check for Update option.
  15. Press on Download and choose the location where you already downloaded the iPadOS restore image.
  16. Press iPadOS restore the image.
  17. Tap “Open”.
The process of installing the beta version will take some time to install iPadOS on your iPad. Until installing is not complete, you don’t have to unplug your iPad device from your Windows PC or Mac.

How to Install iPadOS 13.4 Beta 3 in iPad Using Profile
For installing the beta version, it is essential to have a developer account. Without a developer account, downloading any non-Xcode beta version is not possible. The configuration profile is a way better and easier process to install the latest beta version without the help of iTunes. Installing from the profile method is faster than the iTunes process, and here is the way to install it.
  1. Type developer.apple.com in URL address bar of your iPad.
  2. Click on “Discover.”
  3. Click on “Operating system button” at the top of the screen.
  4. Press “Download.”
  5. Log in with your personal developer account “Username and Password.”
  6. Move on to iPadOS beta column to press “Download” after just after its process of Download will begin.
  7. Press “Close.”
  8. Launch the “Settings.”
  9. Click on the “Profile Downloaded.”
  10. Click on “Install” and type “passcode” if required.
  11. Agree to the policy and form and then tap on “Install.”
  12. Tap on “Restart” to apply the changes in your iPad.
For installing iPadOS beta, you need to visit the Software Update column in your iPad after your Profile loaded.
  1. Open “Settings” of your iPad and then tap “General” option to 
  2. reach “Software Update” by scrolling.
  3. Tap on the “Download and Install” available option.
  4. Type “passcode” if your device encrypted with a passcode.
  5. Agree on the “Terms and Conditions.”
  6. Click on “Agree” again to begin downloading and installing.
After the file installed and installing start to begin, your iPad device will start to reboot. It will take a couple of minutes to install, and in that interval of time, you don’t have to press any key of iPad. Later on, you just need to apply your Apple ID and passcode to begin your iPad.
Daniel Ryan is a creative person who has been writing blogs and articles about cyber security. He writes about the latest updates regarding norton.com/setup and how it can improve the work experience of users. His articles have been published in many popular e-magazines, blogs and websites.
It has been often seen that the user interface controls and the URL in most of the web browsers are found at the top in the mobile phones. However, the layout is not so great when it comes to using the device having the large screen and that too with some certain restrictions. But if we look into some of the browsers such as Vivaldi mobile and Firefox Preview, then we will find that the products have included the bottom screen user interface which is easily accessible and they also can be managed conveniently with the thumbs. Now, the surprising thing is that the users can find a similar user interface in the menu option at the bottom screen but it is hidden in the experimental settings of Chrome on android.
Google is always known for making innovations in the user interface of Chrome and whenever they experiment drastically and came out with extreme changes then Google often hides such things in the menu of feature flags. Google is known for its speed and simple user interface all across the world. Chrome loads multiple tabs, pages of websites and applications at the fastest in other words with lightning speed. The web browser designed by Google not only helps you to add multiple extensions, apps, and themes to its store along with providing you with the updates regarding productivity, education, and games but also keep your online data safe while browsing due to its inbuilt malware detection facility.
  • Now, Google has introduced a new feature which is the part of Duet and could be enabled soon. But at present, the users can edit the flags of the app and turn on the menu hidden in the bottom screen. Here are the steps to do it conveniently:-
  • First of all, the users should go to the Chrome app of their Android and then move to chrome://flags.
  • After then, the users will need to look for “Duet ” after going to the search bar.
  • Now, being the user you have to click on the menu having drop-down option appeared next to Chrome Duet.
  • Then, you have to make a selection of the configuration button that you wish to select from the drop-down menu option.


Now, here is the list of each option and what is the meaning of each option appearing in the drop-down menu for the users:-
Home -Search-Share variation and Enabled options will provide you with the options such as search, home, and share which could be added to the bottom menu.
NewTab-Search-Share :the variation will help you to add the options such as share, new tab and search to the menu.
When you will be directed to the Home-search-TabSwitcher variation then it will facilitate you to add search, a shortcut of the new tab and home button to the available menu Whereas Disabled and Default options could be used to turn off the user interface.
Now, the users can select their preferred configuration button and then they will need to make a click on the option of Relaunch available at the bottom menu. It is necessary to click on Relaunch if you want to apply the changes to be made applicable. The users will need to restart their app and once the Chrome will be loaded, a shortcut menu should appear to you at the bottom of the screen.
Daniel Ryan is a Norton product expert and has been working in the technology industry since 2002. As a technical expert, Daniel has written technical blogs, manuals, white papers, and reviews for many websites such as norton.com/setup.
An average individual clicks up to 20 photos per day in the U.S., so it is so normal that we need more space to keep our photos. Fortunately, Google lets us save the entire photos automatically. You can decide afterward which pictures you like to save and which ones to delete. Though we click photos from smartphones, we can easily download images and videos to PC by connecting a device with Google Photos app. If you need to download photos, then you need to download all the photos from Google photos. Keep on reading to follow the instructions.
How to Download All Images From Google Photos
You may download the entire images and videos from the Google Photo gallery simultaneously. To perform it, you have to study to apply Google Takeout as well as schedule the sports.  
  1. Launch Google Takeout in the browser by inserting takeout.google.com in the search box.
  2. You will see the list of various file types and Google services including Calendar, Maps, etc. so scroll to locate Google Photos and then tap on it.
  3. Scroll down then tap on Next.
  4. Select how frequently you need to export pictures and videos and the file type for downloading and also its size. You may select.zip or .tgz files and size should be up to 50GB.
  5. Press Create Export.
The procedure will start, and you will be notified that sometimes it may take a few hours or days according to the size of the file that you want to download. You may continue with the procedure, or you may cancel it. You may also process to make another export.
If you need to download the entire files from iOS devices to Android, you have to follow a  similar process.
How to Download Images One by One
If you don’t need to download the whole thing from the Photo service but only some files, then you may choose the data you want and download it. The procedure is same for the entire kinds of devices.
If you wish to download images one by one, then pursue the given instructions:
  1. Launch the browser.
  2. Navigate to Google Photos.
  3. Launch album.
  4. Choose the selected image.
  5. Tap on 3 dot icon at the top right of the display.
  6. Hit the Download option.
The videos and images are going to display in the zip folder in the Downloads. Obviously, there are also different process to download the videos and images manually if you do not have a lot in the Photos account. You may do that by launching every album, choosing the entire images from the album and then tap on 3 dot icon and hit the Download option.
Else you may apply keyboard shortcuts to download videos or photos by clicking on Shift + D.
How to Archive Photos
You can also desire to move the videos and photos to archive if you do not want to remove them, but instead, arrange the Google Photos properly.
If you want to archive photos, then abide by the given steps:
  1. Navigate to Google Photos in the browser.
  2. Click on videos and pictures that you need to archive.
  3. Tap on 3 dot icon at the upper right and then select Archive.
  4. You may also apply the keyboard shortcut: Shift + A.
  5. Moreover, you may launch Archive by tapping on the hamburger icon at the upper left and then choose the Add photos option at the upper right to insert items to the archive.
How to Remove Unnecessary Photos
If you are ensured that you don’t want these videos or photos from the Google Photos, you may delete them permanently or temporarily.
In case you intend to remove unnecessary photos, go through the below-mentioned steps:
  1. Launch the browser.
  2. Navigate to Google Photos.
  3. Click on videos and pictures that you need to remove.
  4. Tap on trash and move to trash at the upper right of the display.
The removed item is going to stay in the Trash for up to 60 days. If you ensure that you need to remove them before this given time then you need to launch the Trash, click on the item that you need to delete permanently and tap on 3 dots at the upper right. Then select Delete Permanently, and press Delete again to confirm.
Daniel Ryan is a creative person who has been writing blogs and articles about cyber security. He writes about the latest updates regarding norton.com/setup and how it can improve the work experience of users. His articles have been published in many popular e-magazines, blogs and websites.
“Radeon” is one of the popular Product brands by “Radeon Tech Group” related to computers RAM, Graphics units, etc. Sometimes, users face various issues when they try to launch “AMD Settings,” then the software flashes an error alert “Radeon Settings are Currently Not Available.” This issue arises you have recently downloaded new drivers or Window’s clean copy. Thus, it’s an issue related to your driver.
Follow these instructions to know the reasons for this particular issue followed by the troubleshooting methods:
Reasons for Arising “Radeon not Available” Error
The cause of its occurrences can’t be identified clearly. Still, some of the expected and possible reasons mingle in the mind of tech enthusiasts, that it might be due to some incompatibilities and misconfigurations :
  • “Incompatibility Error”: There might be the issue with your GPU drivers, that it might not be cooperating with your “Radeon” software for functioning well.
  • “Malicious Driver”: There is another possibility of arising this error issue that your installed driver can be malicious or corrupt, which might cause this error.
Now, proceed with the troubleshooting steps to fix this error alert by abiding the following instructions:
Restoring the “Radeon” Graphics Driver to Real-Time
There are various reasons for arising this error issue like a malicious driver or harmful bugs. Still, it is recommended to check your Graphics Driver and roll it back to the earlier edition of your driver. To do so, follow these instructions:
  1. First of all, tap the “Window” logo and “R” keys simultaneously to expand the “Run” dialog.
  2. After that, enter “Devmgmt.msc” in the provided space bar, followed by the “Enter” key.
  3. Now, navigate to your corrupted display adapter. It may be a Video or Graphics card. Then apply double click on it.
  4. Then, hit the “Driver” section there.
  5. Now, press the option available for “Roll Back Driver” followed by “OK.”
  6. After a while, a prompt box will show up on your screen asking for your consent to roll back the selected driver; then you have to tap the “OK” tab there.
  7. Next, reboot your system to save the modifications that you have made.
  8. Now, make an effort to connect “AMD” graphics once again.
  9. Then, make sure that the error alert is removed successfully.

Reinstalling Graphics Driver
Check for the earlier editions of your “Graphics Driver,” If not, then reinstall the particular driver,
  1. First of all, You have to delete your currently existing driver from the system to install the new. Then wait for a little for the reboot process of your system. It will launch automatically.
  2. Then, tap the “Window” logo and “R” keys on your keyboard to launch the “Run” dialog box and enter the keywords “devmgmt.msc,” followed by the “Enter” key.
  3. Now, search for the “Display Adapters” and apply double click on it.
  4. Next, you have to right-click on the issue creating adapter and then hit the option “Uninstall.”
  5. A confirmation pop-out will appear on your device; you have to hit the “Uninstall” tab again.
  6. After that, reboot your system to save modifications that you have made.
  7. At last, make sure that the system is resolved. If not, proceed with the next method.
Updating “Radeon” Graphic Driver
In case, the above methods fail to troubleshoot the issue, then it is recommended to update your “Graphics” Driver, that you can perform through two ways:
  • Automatically
  • Manually
If you desire to update your driver manually, then proceed with the under-mentioned steps:
  • First and foremost, you have to search for the “Outdated” driver.
  • Then, install the recently updated version of your particular driver by navigating the website of your product manufacturing company.
  • After that, follow on-screen instructions to update the driver manually. It may take some time to update your driver. So don’t panic and continue with appropriate steps.
Daniel Ryan is a Norton product expert and has been working in the technology industry since 2002. As a technical expert, Daniel has written technical blogs, manuals, white papers, and reviews for many websites such as norton.com/setup.

Fixing such error is not that simple while this is not the con message or the pop up that may occur because of the PUPs and the activated by various system errors.  Such errors arise because of the cyber-attackers that concentrate on delivering the spiteful payloads on a system all around the universe. It is the false error message that fakely propagates concerning a lack of ability to show the content of specific sites properly. Depending on the message, such errors can be solved if the users update the Chrome Font Pack, though this has nothing to do with the Hoefler Text or several other fonts and tab of an update activates all except Chrome update. If you are facing the same trouble, then this post might be helpful for you. Go through the blog and follow the instructions to fix the Hoefler text font was not found an error.

How to Fix Hoefler Text Font was not Found Error

This virus is a serious and harmful PC infection that must be cleared immediately. As the malware is inside the PC, you might be attacked with other cyber threats or unintentionally install the earlier mentioned ransomware viruses. The better method to clear malware is the antivirus engine, as well as the software that can fix the virus effects and free from this error. is a computer optimizer. You must scan the PC with the trustworthy malware removing tool and follow the end procedure.

Clear Malware With the Trust Worthy Anti Malware Tool

Install the reliable anti-malware tool from the official source, including the app provider, Google Play, developers page, or the App Store. You don’t have to depend on the torrent services and free websites when it’s about the protection of the device. Always depend on the official site and clear all the discovered threats to clear the system completely.


Reset Google Chrome Browser to Get Free From the Error

It looks that the malware target the Google chrome browser. Thus after the clear of malware, you must reset the settings so that there must have installed extra add ons, extensions, or plugins that may still show the error.
If you want to reset Google Chrome browser to get free from the Error, then you can follow the provided steps:

  1. Launch Chrome.
  2. Tap on the three dots and click on Settings options to the top right.
  3. Press the Advanced settings option underneath the settings page.
  4. Hit the Reset settings option below the Reset settings menu.
  5. You will then get the box. Tap the Reset option.
Reset Mozilla Firefox

If you want to reset Mozilla Firefox, then abide by the given steps:

  1. Tap on the 3 horizontal bars on the browser.
  2. Choose the Questionmark option underneath.
  3. Click the Troubleshooting information option as the section displays.
  4. Select the Reset Firefox and then ensure by tapping on the Reset Firefox again option.
Get Rid of Useless Applications to Fix Error

If you wish to Get rid of useless applications to fix the error, then pursue the given instructions:
  1. Click on the Windows logo tab to the left and then choose the Apps and Features option on the section.
  2. Check whether you have any unnecessary applications installed as the needed page displays and then the right window.
  3. Choose the program and then select the Uninstall option to delete the shady application entirely, if you have any.

Daniel Ryan is a Norton product expert and has been working in the technology industry since 2002. As a technical expert, Daniel has written technical blogs, manuals, white papers, and reviews for many websites such as norton.com/setup.


There are several causes why you have to guide the Excel folders with a password.  Apply the password that doesn’t mean that you have secrets, but there is possible that you may have various business data and information that you may need to protect from being theft or twit. If there are a group of members are included, then you need to share items as read-only. Two problems that may cause by Excel 2016 password protection, then it is necessary to delete a known password that you don’t remember and forgot. There are solutions to resolve the issue. If you need to delete this post might be useful for you. Read through the blog and follow the instructions to remove the password in Excel 2016.

Kinds of Encryption In Excel 2016

It may contain several causes for the protection of the password. However, here are several methods to apply them. Some of the solutions are described in the list that may work only for kinds of few Excel 2016 password encryption.

A password that stops to launch the files is known as the Open password. When you launch the file, it will prompt instantly. The password that requires some changes in the file is the modify password. Without this, you are unable to edit data though you can still see it in reading the only mode. If the choice is on, you may make a read-only file without any password. There are several differences when it’s about part of the document you want to encrypt. You may guard the document by encrypting the complete folder, or you may also select to guard the worksheet or the workbook.

By selecting the initial, you can avoid others from hiding, moving, renaming, inserting, or removing worksheets however but no content of it.


When You Remember the Password

When you have finished the task and its ready to share it with the client. However, you have protected the Excel document with the password, and you have to delete it before you send it.
  • Launch the document.
  • Type the password.
  • Go to the File.
  • Select the Info option.
  • Click on the Protect Document option.
  • Then tap on the Encrypt with Password button.
  • Then the prompt the section will display with the old password. Remove the password and then tap OK.
When You Forget the Password for Protected Workbook

If you have protected the Excel workbook with a password that you have forgotten that you don’t remember. You can delete it with XML. It will not work if the complete file is encrypted.
You must ensure that the file extension has been enabled.

  • Navigate to the Control Panel.
  • Go to the Folder button.
  • Click on the View and disable option. Disable the Hide Extensions for identified document types option.
  • Then rename the excel file, which is creating an issue by modifying extension from .xlsx to .zip.
  • Launch the zip file.
  • Go to the xl and then worksheet file and extract the sheet.XML folder.
  • As the extraction finishes, launch the file and then view tag.
·         it: <sheetProtection password=… />
  • After locating, then you must remove it entirely. Save changes in the XML folder and then replace the previous one with it.
Daniel Ryan is a creative person who has been writing blogs and articles about cyber security. He writes about the latest updates regarding norton.com/setup and how it can improve the work experience of users. His articles have been published in many popular e-magazines, blogs and websites.


Google is among the most-renowned brands over the globe, and its numerous subsidiaries are a big reason behind it. The company offers countless handy services, and Chrome is one of them. The web browser offers speed, convenience, and security all at once. Moreover, the browser can be equipped with additional useful tools through the Chrome Store. However, there is a chance that you might face Chrome Web Store Network_Failed while using it. So, here are the steps to fix this error.
Upgrade Chrome to the Newest Version
In case the user wishes to upgrade Chrome to the Newest version, then they can pursue the mentioned instructions.
●        Launch the Google Chrome and select the vertical ellipsis menu button in the upper right-hand side of the screen.
●        After that, select the Help option and then choose About Google Chrome.
●        Once you arrange to get to the next screen, Google Chrome will scan automatically to view whether the latest version is applicable.
●        If the latest version of the Chrome version is applicable, you will be pop-up automatically to install it.
●        Now, reboot the browser to view Whether the problem is solved.
Using the Integrated Cleanup Tool
In case the user wants to use the integrated cleanup tool, then abide by the provided steps.
●        Launch the Chrome web browser, select the vertical ellipsis menu button in the upper right-hand side of the screen then choose the Settings from the freshly showed context menu.
●        Once you get into the Settings menu, move all the way down to the lower side of the settings screen and choose the Advanced option to show up the advanced settings menu.
●        After seeing the Advanced Settings menu of Chrome, move all the way end to the Reset and clean up field then select the Cleanup computer.
●        After that, select the Find tab connected with Find harmful software.
●        You have to wait for the scan process to finish and pursue the on-screen steps to delete damages files if any are found.
Scan System with Malwarebytes
In case the user wishes to scan the system with Malwarebytes, then they can pursue the mentioned instructions.
●        You should begin pursuing this guide on installing and setting up MalwareBytes to remove the web browser of adware and malware.
●        Once you pursue the guide over and arrange to delete the malware, reboot the system to finish the deletion of any leftover files.
●        Once the next startup is finished, hold Win + R keys together on the keyboard to launch the Run dialogue section.
●        Then enter ‘appwiz.cpl’ into the text section and hit the Enter button to launch the menu of Program and Features.
●        After managing to get into the menu of Programs and Features, move down via the installed apps list and find the Google Chrome. In case you view it, right-click on it then select the Uninstall option from the freshly showed context menu. Thereafter, pursue the on-screen pop-up to uninstall Google Chrome properly.
●        After uninstalling process is completed, reboot the system once more.
●        After the next system startup, go to this URL from Internet Explorer or another browser, then pursue the steps to download and install the newest version of Chrome. Once download the installation executable, pursue the on-screen pop-ups to install the newest Chrome version on the system.
●        Now, after installing the latest version, launch the Google Chrome and redo the action that was previously causing the problem to view whether the issue has been solved.

Modifying the Download Directory
In case the user wants to modify the download directory, then abide by the provided steps.
●        Launch the Google Chrome and select the vertical ellipsis menu button in the upper right-hand side of the screen.
●        After that, from the freshly shown context menu, choose the Settings option.
●        Navigate to the Settings menu, move down to the section of Download and select the Change tab connected with Location
●        In the Location screen, select a location that is valid, and it’s not subject to turn inapplicable in the future then choose the Select Folder.
●        After modifications have been enforced, then reboot the system and view whether the issue is solved.
Download the Extension Manually
In case the user wishes to download the extension manually, then they can pursue the mentioned instructions.
●        Launch this URL on the Chrome browser and locate the extension that is failing to download and installing with the “Network_Failed‘ error.
●        In case you arrange to locate it, choose the whole link and copy it on the clipboard.
●        After copying the link on the clipboard, go to the link and paste it into the Chrome Extension Downloader, and choose the Download extension.
●        After downloading the extension, launch the Extension screen by going to Vertical ellipsis menu button and choose More Tools then select the Extensions or by pasting the pursuing address straightly inside the navigation section and hitting Enter: Chrome://extensions/.
●        In case you arrive at the right location, easily move and place the extension file you before downloaded at solution 3 and pursue the on-screen steps to finish the installation.
●        Reboot the system and view whether the extension is working correctly at the next browser startup.
Reset the Chrome Browser
In case the user wants to reset the Chrome browser, then abide by the provided steps.
●        Launch the Google Chrome and select the vertical ellipsis menu button in the upper right-hand side of the screen.
●        You should click on the Settings.
●        Once you get into the Settings menu, move down to the end of the window and choose the Advanced drop-down section to create the advanced settings visibly.
●        Move down via the advanced settings and select the Restore settings to their standard beneath the Reset and Cleanup option.
●        Once the operation finishes, then reboot the browser and view whether the error ‘Chrome Web Store Network_Failed‘ has been solved.


Source: How to block Targeted Ads Around the Web

If you own laptops and smartphones, then you may have faced a situation when the websites on your device get flooded with ads for some products you recently searched. If you are irritated with these targeted ads, then you can choose to opt-out of them. But before that, you should have complete knowledge about the targeted advertisements.
About Targeted Advertising
Targeted advertising can be defined as the way adopted by the advertisers so they could reach potential consumers and influence them to purchase a particular product or service. These targeted ads delivered all along the websites are based on several factors such as income and educational level of the individual, opinions, lifestyle, economic status of the individual, race, age, and other details. The details are even much more in-depth and go to the inclusion of various types of targeted advertising such as mobile, time-based, content, behavioral, location or geographical based, social, search engine, sociodemographic, technical and retargeting.
Whenever, you got the targeted ads just after when you finished your search, it is obvious to think whether companies are looking at us or at whatever we are doing online. It is true that the companies got the details of whatever we search online, but it doesn’t mean that they also know about the particular identities. The targeted ads served to us is just the collections of samples taken randomly by the machine and not disclose the specific identity. However, if the data collected could be got into the hands of any evil entity, then it could pose a threat, but it is not so easy unless the evil entities do not know who you are. If you want to reduce the impact of these targeted ads, then you can take several measures some of which are given below:-
You can opt-out with WebChoices
Digital Advertising Alliance has the regulatory policies which aim at controlling the targeted aids across the web, and the users can use it to opt out of the ads. Digital Advertising Alliance provides a tool called WebChoices to manage the ads. The device can quickly scan your mobile or computer to see the targeting practices of 134 companies, and the users can perform it very quickly. You need to go to the portal of WebChoices and run the scan. When the scanning is completed, you will get the pop detailing some things. You have to tap on the Continue button when the pop appears to see the exact list. The list could be pretty long, and you have to keep scrolling in which you would find some big names such as FaceBook, Google, Twitter, etc. The users can opt-out of the ads by tapping on the link “Select All” and when you have finished the process, then click on the option “Submit Your Choices“. However, while performing the whole process, the users should keep in mind that this does not mean that you will be stopped getting ads. It just says that you will end getting personalized ads that were based on your online activities.

Choose Per Network Basis
The users can also choose the option of per-network basis if they want to opt-out of the targeted ads and here is the overview of some few big ones:-
Controlling Targeted ads on FaceBook
The users need to follow simple steps by the first login into your FaceBook account and then move to the Settings. Further, users can select “Ads“.
The users who are performing the function on mobile should go to the Menu and then head to settings.
Then, the users can click on Account Settings and further select Ads to opt-out of targeted ads.
When the users click on the option of Ads, then they will find a bunch of information regarding the content of the ads. The users can customize this by clicking on each category and also remove some topics by going and clicking on the section “Your Categories“. The users can also choose to hide some ads if they don’t want them to appear frequently by clicking on “Hide Ad Topics”.
Tips to Control Google Ads
Google is the biggest ad company in the world, and the users should go to the Ads Settings Page to opt-out of the targeted ads. When the users toggle on the top of the options, they will find the options to opt-out of the ads and also they can choose the newly introduced feature ” Reminder Ads” to get rid of personalized ads.
Controlling Ads on Twitter
The ads settings of Twitter are quite straightforward to follow; however, difficult to find as it tucked in the personalization menu. The users have to tap on their Picture Profile and then select Settings and further click on the option “Privacy & Safety“.  Now, the users have to search the option of  “Personalization & Data ” and further start editing by clicking on “Allow All”.
Controlling Instagram Ads
Instagram does not provide any dedicated ad settings, and so the users have to go through per ads basis to hide the ads. Further, the users either block or hide the ads appearing on Instagram, but the users should again keep it in their minds that it does not mean they will not receive any ads further. These targeted ads provide the websites to earn money, and so you can opt-out of these and not wholly stopped them.
The users can opt for some other options too, such as they can block the ads if coming frequently. They can block ads by all means if the pop-ups are regularly appearing and they are getting disturbed from this. However, you can allow the ads if they appear on the sidelines only. The users can avoid the ads on the sidelines and so companies posting such ads could earn enough money from these. The users can choose to opt-out of the advertisements which are bothering them; however, they will appear on the other networks and websites you will further browse.

The Passage is among the most known TV series based on a book series. The vampire-thriller drama, but the series failed to live up to its book counterpart. Now, FOX has decided to cancel the series due to the audience dropped at the end of the first season. Also, Instagram posts from the youngest character Saniyya Sidney improves the lot of traction. Yet you must not panic as The Passage might have a great chance to grasp by Netflix or other networks. Here is everything to know about the matter:
Premature Cancellation
FOX has grabbed the attention of few notorieties for ending the series too early. It comprises One Day at a Time, The Tick, and Humans. But it becomes even worse when the network planned to cancel it only after its first season. Fox has declared that it will not be releasing its season two occurring the huge disappointment. The conviction was still surprising as there are still ways for shows to emerge. The initial season of the show is based on the first book in Cronin’s trilogy, and creators had the complete plan to create the following one. There are particular production challenges because of the complex plot in the second book. Though it is not that big that a skilful team is unable to overcome.
It’s About the Numbers Game
The renewal of series depends on the troop of fans who stream it. Considering this, The Passage still had a decent start. When the series dropped in January 2019, it earned the amazing views of 5.2 million for each episode. But slowly, it went off the track and failed to maintain the viewership. The worst part is that merely 3 million viewers watched the season 1 finale. It is clear that the initial magic of a show vanished; however, is it that bad that there is no space for season 2.

Balancing Entertainment and Sports
Rumours are that FOX has signed the 4-year contract to air NFL’s Thursday Night Football. Reportedly, this deal is going to earn more than half a billion dollars per year for the company; however, this is not the only reason. FOX has rights of the postseason games of Major League Baseball also.
Fridays are booked for WWE Smackdown Live and all these specific strain on a broadcasting schedule of networks. Also, there are clues that FOX displays that most series shows violence. The lucrative dealing with the sports franchises that take the valuable prime time to illustrate.
Fans were also confused when Brooklyn Nine-Nine and Lucifer got cancelled. The exact explanation is that there was not enough time available to pressure these shows on a schedule of FOX broadcast. Although Lucifer is available on Netflix and the Brooklyn Nine-Nine has got the new room on NBC.
What to Expect in Next Season
The further sections include some spoilers for the second season. It will prompt you to join fans that provoke network to continue from where the FOX left. The series follows the book, and so season 2 is taking place after the 100 years. You will then discover things that happened to the main cast and how they able to survive or if they were able to survive. The story of Amy is quite interesting as it dwells in both the Vampire and human worlds. And it quite interesting to see how she will cope with it. The challenge of moving from one century to another in next season is huge. But creators will win if they are successful in keeping audiences at an edge.
Ritual of Passage
It is good to wonder that The Passage has the chance to grab by Netflix or other networks. During its writing, season 1 was on Hulu, and it may also follow the second season.
Daniel Ryan is a creative person who has been writing blogs and articles about cyber security. He writes about the latest updates regarding norton.com/setup and how it can improve the work experience of users. His articles have been published in many popular e-magazines, blogs and websites.
The users of Android phones are always in the search for the ways to update their phones as there exist countless ways. Most of the Android users often wait for the latest updates and wished that their phones could run the updates automatically. The users can check for the latest updates by only going into the settings and then click on About phone. When the users click on the option of “About Phone”, then they will be directed to system updates on their pixel. The alternative is however convenient for the users, but it is one of the slowest options too as it hugely depends on the carrier you are using to roll out the updates. There are also some ways if you are not interested in the slowest one such as you can sideload the latest updates yourself.
The users have to do a few things before they could go for updating their Android phone. The users should create a backup for all their essential files; otherwise, the things may go wrong if you have to wind up the whole procedure due to some bugs or technical glitches. The users may get confused and find it difficult to follow the procedure of sideloading the latest updates because the steps involved are quite complicated, leading the whole process intimidating.

The pixel owners have many other options also, which could be called a bonus for them if they are not convenient with sideloading the latest updates. The other option is very much easy to follow and does not require a lot of extra work. The pixel owners can use Google’s Pixel Update and Repair service, and it will make them able to not only find the new updates but also installing them. The service introduced by Google has made it much easy for the users to get information about the latest updates and patches of Android. However, the users need to keep a few things with them before following the instructions of the repair tool of Google, and the things to keep are the following:-
  • They must have a PC along with the pixel device they have.
  • The users need to connect their PC to the phone they have, and for this, the users should have a USB cable.
  • The users must be careful and keep their phone and PC disconnected until they are not asked by the Pixel Repair tool to plug it, and along with this the users should have a web browser supporting WebUSB.
How to Use Pixel Repair Tool for Updating your Pixel Phone
  • First of all, the users have to visit the Google Pixel Update and Repair page on their PC and then choose the carrier appearing in the drop-down box.
  • In case, if the users are not able to see the carrier listed, then they should tap on the option of “Additional Carriers”. Further, the users also have the option of choosing additional carriers>other, if they are getting the device unlocked.
  • In the next step, the users have to tap on “Next” after picking up their carrier, which could further begin the update and repair process.
  • The users will be guided to backup their data by the tool, and further, they will have to follow the remaining steps appearing on the screen.
  • The appearing on-screen instructions will include some settings putting your phone into “Rescue Mode” and then connecting PC to the Phone through USB.
  • The users should wait for a while to get the updates arrived, and if you are getting no updates, then the users may be directed to Factory reset their device.
  • If the users are directed for factory reset, then don’t do this and further the repair tool should be closed. The users should undo their phone which is in Rescue mode by holding down the power button for at least 10 seconds and then again hold it for 10 seconds while pressing it.
Daniel Ryan is a creative person who has been writing blogs and articles about cyber security. He writes about the latest updates regarding norton.com/setup and how it can improve the work experience of users. His articles have been published in many popular e-magazines, blogs and websites.
“Witcher 3” is one of the most admired and unprecedented game based on Andrzej Sapkowski’s novel series. The game holds various ventures including Geralt of Rivia, a Witcher who is a monster hunter. Witcher 3 is generally an action RPG having the perspective of the third person and the game based on wild Hunting.
 In the game, players have to struggle to control and stop this monstrous Witcher who knows various tricks and techniques to kill both humans and creatures. He holds two swords: one is silver, and the next one is steel.
The monster hunter kills humans with steel sword and with the help of a silver sword, he kills creatures and other monsters. Gamers have to apply various tricks to save themselves from Witcher. It includes fighting with them, magic, and other weapons.
There are numerous powerful bosses who come in various sections of the game. Let’s take this guide to know more about those strong bosses:
  1. General of Ice: Powerful
Imlerith, the general of Ice is one of the most powerful and formidable bosses of this game who knows various tricks to defeat his enemy. Geralt always wants to take revenge from his enemies and desires to stop the prevailing wild Hunting by defeating all his enemies. The strength of Imlerith comes with the strength of the monster. He knows various tricks and attacks, and thus he must want to void Witcher code to go on top of the battle by defeating all the opponents.
Geralt wants to defeat this boss by his quick speed against Imlerith’s slow speed. The difference in both the opponent is big. Imlerith will twirl around the Warfield after putting both the hands-off his strong mace.
  • High Vampires are a Pain: Powerful
There are various evil faced monsters in the game. When we talk about monsters playing dangerous roles in the game, we think of vampire “Dettlaff.” He is one of the powerful bosses in the game.
In the start of the story, Dettlaff became silent when he saw the monster is killing at least two hundred people as the most dangerous beast of Lydia. He didn’t care then, but he acted swiftly when he heard the news that the beast kills a young boy who offered an apple to Dettlaff. He views the world only in white and black as a sign of right and wrong. He saw that the beast was black and the boy was white. Then, he kills him like the mark of evil.
  • The Hags of the Swamp: Powerful
There were three foul-smelling bosses known as the ladies of the woods. The controlled and area of Swamp nearby the regions of Velen.
These creatures are more powerful as Geralt even heard about them. They have tremendous smelling and listening skills. They observe every occurrence and mishap around their area. They are the rulers of their land as anyone can’t defeat them in their area.
  • The Man of Glass: Powerful
There is another powerful boss who is known for the soul “Gaunter O’Dimm.” The souls are his desired thing for betting anything to battle.
O’Dimm is the most powerful boss just because of the deviousness and how he traps you after finding loopholes. “O’Dimm” offers the chance for saving Geralt. In the end, the deal between both of them struck in the matter of bargaining their statements. Thus he defeats Geralt in the game.
  • The Air Djinn: Powerful
The Djinns are powerful by their mystic wishes as they fight with their opponents by their wishes. Generally, you will see four kinds of genie and all of them are based individually on four different elements: Fire, water, air and earth. If you got one of them, then you would become more powerful as you will be provided three different and magical wishes. These powerful wishes help in transforming real desires and willingness.
Daniel Ryan is a Norton product expert and has been working in the technology industry since 2002. As a technical expert, Daniel has written technical blogs, manuals, white papers, and reviews for many websites such as norton.com/setup.
Awaiting edits to the plot of Disney+’s new TV series Obi-Wan Kenobi casting Ewan McGregor as the leading actor might get only 4 episodes that were initially expected to have 6.
The TV show Obi-Wan Kenobi by Lucasfilm is reportedly getting apparent alterations, and that is the decreasing the counts of its episodes. Theories on the upcoming TV series casting the most anticipated Jedi Master is being spread throughout years, however, Lucasfilm eventually verified in 2019 that the show is coming for real. The TV series was officially introduced at D23 along with the declaration that Ewan McGregor would be the actor to portray as Obi-Wan. He is again showing up in the upcoming Disney+ shows, along with The MandalorianDeborah Chow is directing the new series with initially having a total of six episodes.
At the time, Lucasfilm introduced the news regarding the Obi-Wan Kenobi series, also stated that most of the script was completed, and filming will start in 2020. The Disney+ show might release in 2021 launch on. Bu t, the latest depressing rumors regarding Obi-Wan Kenobi’s production have driven out to be right. When Lucasfilm should have fully dedicated to the production Obi-Wan Kenobi TV show, the studio has left the Obi-Wan Kenobi show suspended by reason of worry about the show’s plot. This unclear holdup would not only modify the show’s plot but also decrease the counts of episodes initially decided.

Following the recent news regarding Obi-Wan Kenobi TV series is getting suspended for an indefinite period, THR and informational offered further information regarding what they got to know about the TV series sudden breakdown. As per their resources, the new planned storyline will only introduce a total of 4 episodes, which were supposedly six. Despite the fact that the production is now on hold and only four episodes will be cast, the actor Ewan McGregor still holding his place as well as Chow is also staying as the director of the show, however, a new script team is getting recruited.
The decreased number of the show’s episodes just explains the up and down of the Lucasfilm effort to put McGregor back on his foot. At one point, he was thought to play as Obi-Wan as the popular Jedi master in the Obi-Wan film, and many people wished to get a complete trilogy for the Obi-Wan movie. When some of the audience were depressed by the sad news about Obi-Wan is not coming back to the big screen, the report of Obi-Wan Kenobi is releasing on Disney+ thrilled them. When they heard the show is releasing in the form of a six-episode series as well as each episode of one hour, they become happy. Now the episodes of Obi-Wan Kenobi have changed to 4 as well as one episode might last only for 30 minutes rather than being an hour-long episode if the show applies the same directions as The Mandalorian.
Still, now it is too early to believe this news of cutting down 2 episodes from the show is a wise decision or the downfall of the studio. The Obi-Wan fans would never be happy with this news since they might need to wait a bit longer for the TV show release, and they may likely strain out their interest from the series entirely.
Daniel Ryan is a Norton product expert and has been working in the technology industry since 2002. As a technical expert, Ava has written technical blogs, manuals, white papers, and reviews for many websites such as norton.com/setup.
The popular RPG game of Game Freak has proved critics wrong by pertaining to be trending in its third month of release. Those who are not aware of the popular controversy of removal of national Pokedex, it happened immediately after the release of the game in November 2019. Several critics and fans have criticized Game Freak for deducting the original Pokedex from Sword and Shield.
 However, they remain silent at that time and now finally have answered everyone by the acquisition of numerous fans alongside popularity. Although, there is so much to be presented in the honor of Pokémon franchise but let’s get straight to our purpose of creating the subsequent blog.
Pokémon world is known for catching Pokémon’s so does the Sword and Shield, and in the article, we will share specific ways to catch a rare Pokémon in the Galarian world. The Pokémon is known as Dhelmise and thus, has created a lot of hype among gamers. In the article below, we have provided a proper strategy to catch Dhelmise in Sword and Shield.
About Dhelmise
Dhelmise obtains the ability of Ghost/Grass-type Pokémon and has been retained from the 7th generation video game of Pokémon franchise aka Sun and Moon. The Pokémon can execute few attacks of Steel-type Pokémon that make it a rare Pokémon.
The Pokémon stand among the potent Pokémon lineup in Sword and Shield. The statement can be justified through its stats; 134 base moves in competitive gameplay. The subsequent Pokémon attain an ability to execute a Rapid Spin move. Steelworker is another potent attack of Dhelmise alongside Anchor Shot. The spawning rate of Dhelmise is very low, but using SOS chaining can help the player to encounter it. Beneath, we have brief out the following resort carefully.

How to Find Dhelmise in Sword and Shield

Gamers can encounter Dhelmise in two precise locations; Max raid Battles or Route 9. Besides, there are two hidden spawning places of Dhelmise that also contains a good spawning rate; Outer Spikemuth or Circhester Bay. However, there is a 3% chance of its spawning in the subsequent locations, whereas the prior locations have only a 1% spawning rate. Trainers need to be quite fortunate to encounter the rare Dhelmise however, there is one positive perk about Dhelmise’s spawning; it can be encounter in any weather conditions.
Besides, here is a gimmick to encounter and Catch Dhelmise, gamers need to use the Flying taxi and head straight to Route 9. After that, they need to head to Outer Spikemuth, then get back to route 9. Gamers need to repeat the process several times to encounter Dhelmise. There is another way of using the ability of Harvest to enhance the ability of your Pokémon. It is pretty similar to Flash Fire, and what it does with Fire-types, it does with Ghost/Grass-type. After using the essential item, then your prefer grass or ghost type will be available to encounter Dhelmise for merely 35%.
Conclusion
The primary purpose of the blog is to favor the gamers in catching Dhelmise in Sword and Shield. The article is comprised of all the prerequisite information in reference to the subsequent topic. If we miss out on any, then we are pretty apologetic about any such mishappening. In the end, we believe that the article will help you in achieving your purpose, and you will definitely be greeted well by it.
Daniel Ryan is a creative person who has been writing blogs and articles about cyber security. He writes about the latest updates regarding norton.com/setup and how it can improve the work experience of users. His articles have been published in many popular e-magazines, blogs and websites.
Source: How to Enable Apple TV's Conference Room Display Feature?

Apple TV by the help of Conference Room Display mode, creates a good presentation tool for offices. You might be aware that an Apple TV is known not only for serving entertainment among its owners but also helpful for doing business activities in immense ways. For knowing about it in a bit detail, go through this blog carefully.

The best thing is that having the Conference Room Display mode is simple. Side by side, there are different ways of personalizing it according to your working surroundings.

Enabling 'Conference Room Display' on the Apple TV
  • Firstly, go to Settings on the Apple TV of yours.
  • Then, press the AirPlay and HomeKit.
  • After that, press the Conference Room Display.
  • Lastly, press the Conference Room Display. Note that it should be titled 'On' now.
Using PIN for Conference Room Display
  • Firstly, go to Settings of the Apple TV of yours.
  • Then, press the AirPlay and HomeKit.
  • After that, press the Conference Room Display.
  • Next, press on Require PIN Every Time. Note that it should be titled 'On' now.
Remember that if your Apple TV belongs to a HomeKit setup due to any reason, enabling the PIN requirement shall delete that from that setting.

Seeing the preview of Conference Room Display
  • Firstly, go to Settings of your Apple TV.
  • Then, press the AirPlay and HomeKit.
  • After that, press the Conference Room Display.
  • Lastly, tap on Preview.
Note that after completing the above instructions, you shall be able to watch the preview of the 'Conference Room Display' mode because you have set it.


Setting a custom message of 'Conference Room Display'
  • Firstly, go to Settings on the Apple TV of yours.
  • Then, press the AirPlay and HomeKit.
  • After that, press the Conference Room Display.
  • Next, tap on Custom Message.
  • Then, write the custom message of yours.
  • Lastly, tap on Done.
Choosing a background picture for Conference Room Display
  • Firstly, go to Settings of the Apple TV of yours.
  • Then, press the AirPlay and HomeKit.
  • After that, tap the Conference Room Display option.
  • Next, press on Select Photo.
  • Then, tap on Apple Photos.
  • After that, tap on a category. It can be Animals, Flowers, Landscape, Nature, or else Shot on iPhone.
  • Lastly, select the photo that you wish using for the display.
  • After completing the above-mentioned steps, you should see the preview for watching the way the display shall seem after putting into the Conference Room Display mode.

Daniel Ryan is a creative person who has been writing blogs and articles about cyber security. He writes about the latest updates regarding norton.com/setup and how it can improve the work experience of users. His articles have been published in many popular e-magazines, blogs and websites.

Source : Marvel's Spider-Man: Guide for Mission of Black Cat Hidden Doll

The virtual universe of Spider-Man came into existence in September 2018. Till now, it is kept on adding new features to the game. Gamers are pretty excited after witnessing their ideal superhero in a whole new world of Play station. Although, the game is almost 2 years old still several quests of it have become a mess for the players. The most intricate among all of them is the quest of collecting 11 Black Cat Doll. The following article is about accomplishing this quest through a specific guide and the process of it is a bit lengthy. So, it is highly suggested to be aware while reading this article to avoid any mistake.
Start the Quest
Gamers need to reach a specific point to begin this quest. and this can be easily done through the accomplishing of all the quests. Gamers need to complete all the quests to get access to Black Cat Doll’s quest. Once, players get access to the prefer mission, then they will get to know that there are a total number of 11 Cat Dolls to be located. Below we have specifically brief out the location of each:
Harlem Cat
Gamers can easily track down the location of the Cat in this area through the symbol of Insignia. Instead of this way, there is one more; gamers need to follow the murals of the cats that are located on the roof of the building in NYC.
Upper West
Gamers can easily locate the cat in the Upper West Side area through the symbols of stakeout. Instead of this way, there is one more; gamers need to follow the building in which there is two triangular-shaped windows.

Upper East Side
Gamers can easily locate the cat in the Upper East Side area by locating the building which contains a spherical roof. gamers will find a Black cat mural on the top of the building.
Two Midtown cats
This is one of the most intricate ones to locate and it can be easily done by the player by locating the building whose roof contains a Water tower. gamers will attain the first Midtown Cat in the Northern section whereas the second one lies in the Southern part.
Gamers need to head towards Stakeout and there in the right section, they will find another Black Cat mural. Inside the mural, they can easily locate the second cat of Midtown.
Two Hell Kitchen Cats
The first cat is available in the northern part of the preferred region. Gamers need to locate the cat mural on the top of the Jewelry  store and once gamers reached there, then they will find the cat on the left window.
The second cat is lying on the southern section of the preferred area and gamers need to locate the building whose roof contains Graffiti on it. Once, gamers successfully reached on the top of that roof, then they will encounter the cat inside the Ventilation Shaft.
Greenwich Cat
Gamers need to locate the building whose rooftop contains two tables alongside two Umbrellas on it. The Umbrellas can easily locate through its Orange color and there on the Right side of doorways, gamers will locate the cat.
Chinatown Cat
Gamers will find the cat in Chinatown by heading straight towards Stakeout and try to locate the building whose roof has Graffiti alongside Triangular windows. Gamers will find the doll of the cat inside one of the triangular window.
Financial District Cat
Players can easily attain the doll of the cat in the Financial District area by locating Board Structure; lies beside of stakeout of Financial District. Gamers will encounter a Black Cat doll lying on the top of the structure. 


Daniel Ryan is a creative person who has been writing blogs and articles about cyber security. He writes about the latest updates regarding norton.com/setup and how it can improve the work experience of users. His articles have been published in many popular e-magazines, blogs and websites.


If you are using the Windows 10 for years or have currently upgraded, there are several tricks and tips as well as the unseen features to learn that may help in making the use of desktop every day even faster. For instance, locating the Start section and saving battery with an easy trick. Microsoft mostly doesn’t talk about their hidden features similar to Apple, which becomes tough to get to know about the machine more and use it in day to day life. If you need to know tricks, then you are on the right post. Go through the blog and follow the steps to get to know about the hidden tricks.
Minimize Entire Windows Excluding Active One
If the device is getting too crowded with the launch windows, you may fastly diminish them, excluding the window you are working on.
If you wish to minimize entire windows, then pursue the given instructions:
  1. Tap on title box of window you like to keep its launch to choose it.
  2. Hold mouse down, then drag a window from side to side, fastly shaking it. After the few fast shakes, other launch windows will be minimized, keeping the one open that you have shaken.
Launch the Secret Start Section
You know already that you have to go to the Start section; you click the Windows tab underneath to left or on keyboard. While Windows 10 has the second Start section, which is less known than it does access the necessary features, including the Control panel, Command Prompt as well as the Task manager more accessible.
You may access it by 2 different methods:
Clicking Windows key + X else tap on Windows Start or Windows option.

Also Visit Related site :-  Best Hidden Windows 10 Tricks You Must Know
How to Create the Event Without Launching Calendar App
Windows 10 new update allows you to fastly insert events to the Microsoft calendar from the Taskbar without even launching the calendar.
If you need to create an event without launching the calendar app, then you can follow the provided steps:
  1. Tap on the box with date and time in it at the right, on the Taskbar.
  2. Select the date as you like to schedule the event.
  3. Insert the event time, name, and location.
  4. Hit the save option. The event should display in the Calendar app across the devices.
How to Take the Screenshot
It is everyone, and maybe everyone knows about it. However, it is also possible that we easily forget to take the screenshot on desktop. There are 8 different methods to take the screenshot on Windows 10.
  1. If you need to capture a complete screen, the easy method is to click Windows key + Print Screen key then the image is stored in Pictures inside the Screenshots folder.
  2. To screenshot only half of the screen, click on Windows key + Shift + S to launch the tool, which is known as the snip and sketch that lets you tap and then move to take the screenshot that will be stored to the Clipboard.
Launch the Item on the Taskbar With the Keyboard
If you will pinned the programs to the Taskbar underneath the screen to make the shortcut, you do not need to tap tabs to launch it. Rather use a shortcut like the Windows key + [Number key] through number key corresponding to a location of a program on Taskbar.
Identify How Much Space the Apps Are Taking
PC begins running slow as space starts to occupy. One easy method to setup may help to free an app that takes the space than they should, especially when they are not in use.
If you want to identify how much space the apps are taking, then abide by the given steps:
  1. Go to the Settings.
  2. Click on the System.
  3. Select the Storage option.
  4. Tap on the drive that you like to locate.
  5. Then press the Apps and games option to check the list of apps downloaded on the PC as well as the space they are occupying.
  6. You will not be free from the browser, but you may locate the game that you have not played for years.
Daniel Ryan is a creative person who has been writing blogs and articles about cyber security. He writes about the latest updates regarding norton.com/setup and how it can improve the work experience of users. His articles have been published in many popular e-magazines, blogs and websites.
Apple has inbuilt features of camera formats to take pictures and videos in HD quality (HEIC) picture and sequence pictures. However, you can use HEIC instead of JPEG files, and your videos will automatically get HEVC instead of H264.
These new features are advantageous to resize your smaller quality photos into High-quality for a little space. You can store more pictures and videos into your iPhone Device. These features were introduced in 2015 and maybe better from an earlier format like GIF. GIFs are more useful to present animated videos and photos nowadays in mobile phones for an update on social media like Facebook, Twitter, Instagram, etc.
HEIC and HEVC files are still not supported in all the devices universally and if you want to take HEIC photos by using your iPhone, they want to send to your friends or family who is using Windows computer.
Here are some methods to export your HEIC files and HEVC files into JPEG files and H264 files. If you continuously send pictures to your relatives and friends who are not using recently launched or current devices, then you can export your photos into JPEG format. It will give you the same quality of your picture in low space. Here is how to save Apple iPhone and Apple iPad pictures export in JPEG from HEIC file format.
1.    Click on settings.
2.    Hit on Camera.
3.    Hit Formats.
4.    Change camera format from the default setting to Most Compatible, which is a High efficient setting the can save you picture automatically in JPEG format and Video in H264 file format.

Exporting HEIC format to JPEG format on your iPhone device
When you have HEIC format photos in your device and want to export in JPEG format, then you can convert files from using your iPhone because it has inbuilt converter features.
  1. Photo Editing Application: Using this application, you can export your HEIC photos in JPEG file format because the Apple iPhone photo editing application has a lightroom who supports HEIC file format.
  2. Email your Picture: Apple Email application automatically export your HEIC photos into JPEG file format, when you Attached or sending your photos via Mail application
  3. Dropbox Camera Upload: Dropbox application is an inbuilt application in an Apple device that can automatically upload Apple device pictures. You can also upload your HEIC photos to export in JPEG. Here are the steps to do so.
  4. Open dropbox.
  5. Tap on Account.
  6. Tap on Camera Upload.
  7. Hit on Save HEIC Photos As.
  8. Tap on JPG.
  9. Open Drive Camera Upload: It is the same as dropbox. One Drive application also exports your HEIC format photos into JPEG file format while uploading. There is no need to confirm the setting, it exports your JPEG images automatically.
  10. Image Conversion Application: There are countless applications on Apps store on iPhone devices that export your HEIV photos to JPEG photos. You can check in your application into your iPhone device’s App Store.
Daniel Ryan is a creative person who has been writing blogs and articles about cyber security. He writes about the latest updates regarding norton.com/setup and how it can improve the work experience of users. His articles have been published in many popular e-magazines, blogs and websites.

We have listened about converting the images document to PDF or Microsoft Word, but it may not be possible for you when it comes to trying it. You may be wondering how to do it or is it easy to perform or not? Here is the option of Batch Word to JPG Converter as from its name, only you may guess it is for converting multiple files together. Thus if you require to convert the multiple files or more than 50 files, then you can use it and convert the data easily without any hassle. If you need to convert it, then this post might be useful for you. Go through the blog and follow the instructions to convert the Word documents to JPG via Batch word to JPG converter.

Batch Word to JPG Converter for the Computer

In this user interface, there is nothing different that you may have to expect. It doesn’t matter how many ideas you have about it; there will be no issues in converting the Batch word to JPG Converter as well. It will not cause any issues for a better understanding of capabilities.

How to Convert Batch Word to JPG

If you have to convert the Word files to the JPG, then you can use the Batch word to JPG converter.

  1. Delete or add files
  • Deleting or adding files is too easy.
  • Tap on the green plus option.
  • Choose the files that you need to add. The area will be accumulated with the word files that you want to convert to the images.

When you have to delete the same files or some files then:

  • Apply the CTRL + left click option to choose the one you need to remove.
  • Press a large X option at the top. If you need to delete the whole thing together, then you can choose the option nest to X.
  1. Output
  • The main aspects of the tool for the users are to choose the output file. Execute it by tapping on the menu of the Browse to select the location.
  • If you need to make the new folder, then you have to check the box of the Create the new folder.
  1. Begin the Conversion
  • When you have selected images, then you have to choose a destination from the options so that you can convert it all at once. Before moving forward, you should know that the conversion takes some time when the images are significant or if the PC is not working properly where performance is required. To start the procedure
  • Tap on the Start option at the bottom right.
  • Make sure to choose an exchange format before you start. You can select from eight options in which each of them is admired amongst the users of the Windows. You can download the Batch Word to JPG Converter from its official site.

Daniel Ryan is a creative person who has been writing blogs and articles about cyber security. He writes about the latest updates regarding norton.com/setup and how it can improve the work experience of users. His articles have been published in many popular e-magazines, blogs and websites.

Source:http://setup-request.net/convert-word-documents-to-jpg-via-batch-word-to-jpg-converter/ 


Android users mostly brag about their platform in comparison to iOS because of the setup options and flexibility. You spend discussing features of Note 10 and Pixel 4 XL; however, there are several more things to do after unboxing the new device. If you want to know about the settings, then you might find this post helpful. Read through the blog and follow the instructions to change the settings on Android phones.

Settings to Recover tahe Battery Life

Switch off the auto-brightness of the show and change it to below 50%. It will consume more battery if the screen is brighter. Scroll down the shortcut menu and adjust the slider.

Follow the provided steps to set up to Recover Battery Life:

  1. Several phones have the option of auto-brightness.
  2. Go to the settings app.
  3. Find the brightness option to locate the setting and switch it off.
  4. Use the Battery optimization and Adaptive Battery. Google launched its features on Android 9.0 Pie. They focus on which application you use, how you use the phone, and the quantity of battery it consumes. 
  5. Several Android phones have the Battery menu in the Settings app, while other phones do not have such settings. Go to settings and locate for battery, and then you will get the result on the screen.

Dark Mode

Another way to recover battery life is to use a dark mode of Android. First, the dark mode with Android 9, but Google introduces Android 10 in 2019.

Dark mode in Android decreases strains that Smartphone screens create and affects our eyes as well as it improves the battery life as it consumes less power to show dark background than the white background.

According to a version of the Android phone, you have to locate in settings to find the option of dark mode.

If you want to set the Dark mode, then abide by the given instructions:

  1. Go to the Settings app.
  2. Locate the Dark mode, Night Mode, or Dark Theme. Use the dark mode all the time, or you can also set the schedule from 7 pm to 7 am.
  3. Keep the home screen free of clutter
  4. Long click on the space of the screen and click on the Home settings option.
  5. Search the Add icon to Home Screen option and switch it off.
  6. You can add the shortcut by dragging the apps, but they will not mess on the screen anymore.

Customize Do Not Disturb

Android provides the Do not Disturb option, and your phone will be silent for scheduled hours.

If you wish to Customize Do Not Disturb, then pursue the given instructions:

  1. Go to Settings.
  2. Click on Sounds.
  3. Locate the Do Not Disturb option.
  4. Using this feature, you will able to set the hours when users need to switch off it. However, the notification you may receive will be there when you wake up.

You can also allow the repeat callers as well as the favorite callers and switch it on.

Be Ready to Lose the Phone

If you want to find the device, then you can follow the provided steps:

  1. Go to the Settings app.
  2. Locate the Find My Device option.
  3. If you have a Samsung device, then you can use Samsung’s Find My Mobile option.
  4. Go to Settings.
  5. Click on the Security and biometrics option.
  6. Select the Find My Mobile option.

When you have enabled, then navigate to android.com/find from the mobile device or computer and sign in to the account. Samsung users have to navigate to findmymobile.samsung.com to locate the lost phone.

You will able to see the location on the map assuming the phone is online, and from that option, you can lock the screen or lock the phone or in the terrible remove all the data from the phone.

Daniel Ryan is a creative person who has been writing blogs and articles about cyber security. He writes about the latest updates regarding norton.com/setup and how it can improve the work experience of users. His articles have been published in many popular e-magazines, blogs and websites.

Source: http://setup-request.net/change-these-settings-on-your-new-android-phone-right-away/  


Artificial Intelligence nowadays is a very popular concept in the science and technology field. With its assistance, you can complete your work in much less time. This is because AI automates your work across many industries so that you can do your work in less time. Here are 8 best Artificial Intelligence apps that you can use on Android and iOS.
These apps on your smartphone can help you finish your work in much less time. They have a good AI algorithm that can effortlessly put up with your habits, learn what you like, what you don’t like, tour work timings, and all your daily routine.
1. Cortana
Cortana is a personal assistant app created by Microsoft. It is very smart and helps you to easily track your files, images, videos, and others from your device. You can also sync your PC and smartphone with it, to get your notifications on both the devices. For example, you can set a reminder on your PC to buy milk and Cortana will also alert you about the same on your smartphone. It is a good artificial intelligence app with which you can easily complete your basic digital tasks.
2. Robin
Robin is a very well known artificial voice assistance app for Android and iOS users. It is a free app that can be easily used on any smartphone. It can also let you write a text message through your voice without touching your smartphone, guide you with GPS navigation, tell you funny jokes, and listen to your voice commands. The app also works well with reminders. This app is currently in the beta process therefore, it cannot provide you with a lot of information but it updates itself daily according to the users’ concerns and questions.
3. Socratic
Socratic is the best Math and homework helper app which is available on both Android and iOS. It can seriously help you to do your homework in less time and with adequate methods. Its artificial intelligence feature works very well with which it will help you complete your homework. All you have to do is take a picture of your question with the device’s camera and it will promptly provide you with everything you need to know to solve the problem correctly.
4. Edison Mail
Edison Mail which is also known as easilyDo is a smart assistant app that acts as a personal assistant for you. The app is available for both Android and iOS and is free to download. It can tell you about the traffic on your way to your destination so that you know when to leave for your work. Using its Artificial Intelligence, it can also remove duplicate contacts from your contact list. You can also ask it about the shortest and fastest way to your home. The app can also smartly book your ticket for hotels, movies, restaurants, events, and others.
5. FaceApp
FaceApp is one of the very famous artificial intelligence apps. The app is developed by Facebook and is available on both Android and iOS devices. It uses AI to easily transform your images into fun photos. You can change your look, gender, hairstyle, and many other things with this app. It has amazing filters with which you can change your smile, add face filters, and make a fun photo. You can even change your hairstyles and create a new hairstyle for free.
6. SwiftKey Keyboard
The SwiftKey Keyboard is an artificially intelligent keyboard for android and iOS users that corrects your wrong text automatically. Its amazing feature will autocorrect your word and sentence while you type. Apart from the autocorrecting feature, you can also change your font style, color, design, and theme of the text and keyboard. It also has a good emoji collection.
7. Leia
Leia is a very useful artificial intelligence apps for Android and iOS users which can build a website for you without you having any development knowledge. The app is created by Vybe Software LLC for Android and iOS users. It is a free app and has in-app purchase options. The app can also be used as a voice to text app on your smartphone. The best part is that it also has a vast collection of themes to design a blog, website, landing page, and others, that too on your smartphones.
8. Replika
Replika is an AI app that will help you to improve your conversation skills. You can also call it your good friend as you can easily download it on your Android and iOS devices to start an endless conversation with it. The app lets you learn about your true personality. You can save your notes here, create memories on its notepad section, and also handily track them anytime. The app is available for free on all Android and iOS devices.
Cynthia Strickland is a creative person who has been writing blogs and articles about cybersecurity. She writes about the latest updates regarding office.com/setup and how it can improve the work experience of users. Her articles have been published in many popular e-magazines, blogs, and websites.

How to Make Dubsmash Without Holding Button

Dubsmash app released back in 2014, and in the same year, it reached over 50 million downloads worldwide. In 30 countries, it became the number 1 app, which itself is a quite significant feat. The main offering of the app was that it provides users with an opportunity to remake or reshoot the most popular dialogue, famous films, and TV shows. As the application got feedbacks from various users, the developing team made many improvements and changes to the apps. The controls, UI, and UX of the app are now far different from the original version. Do you know that you can even now shoot the Dubsmash videos without in need of holding down the record button? Here’s how to do so. 

Step by Step Tutorial: How to Make Dubsmash Without Holding the Record Button? 

Step 1: Set up Dubsmash  

Firstly, make sure that the Dubsmash app is installed correctly and then sign up to the app using your registered ID and password. If you are a new user, then make sure to create a new account on Dubsmash. Once the app is settled, head to the Explore tab on the Dubsmash app. 

Step 2: Setting Up the Audio Clip

From the Explore tab, one can quickly get the trending and most used audio clips. You can also use the My Sounds tab to find an audio file from a TV show and movie that is not available in the Explore tab. 

If you want to upload another audio file that is not available on the Dubsmash server, then head to the Profile page. There you need to head to Sounds and then tap on the Add New Sound located on the upper-right corner.  

Step 3: Pressing the Dub Button

Once the audio clip is selected and you are all set to initiate the recording, just hit the Dub button, which has a purple colour. 

Step 4: Tapping the Dub button Only for Once 

As on step 3, once pressing the Dub button, the camera will activate to record your face. Once you are all set to start the recording, press the Dub button once more to initiate the recording, and there is no need to hold down the button. When you hold it down for the entire session, it is the biggest mistake you do while using the Dubsmash app since the app developers recommends to only tap the button for once. 

You can also set a five seconds timer before the device initiates the process of making Dubsmash and starts mixing your video recording with the sounds effects presented in the audio clip. 

In case you want to take a pause in the middle of the recording, just tap the purple Dub button for once. This will instantly pause down the process of creating Dubsmash. Bear in your mind that tapping the button for once will not stop the recording process. When you get back ready for recording your current video, tap the same button for once to resume the recording as well as the audio playback. You can use the pause and resume options for as many times as you want. 

Step 5: Finishing the Dubsmash 

Once the process reaches the end of the audio clip, the created Dubsmash will play for a preview. 

Then you have to press the Next button if you are satisfied with the Dubsmash. Now you will need to add captions to your clip and also audit the privacy settings. Tap on the clip to save it your local device gallery, and you can also share the clip directly on the social platforms by using the controls provided in the app. 

Daniel Ryan is a self-professed security expert; he has been making the people aware of the security threats. His passion is to write about Cyber security, cryptography, malware, social engineering, internet and new media. He writes for Norton security products at norton.com/setup.

Source:https://nortoncomsetup-en.uk.com/how-to-make-dubsmash-without-holding-button/